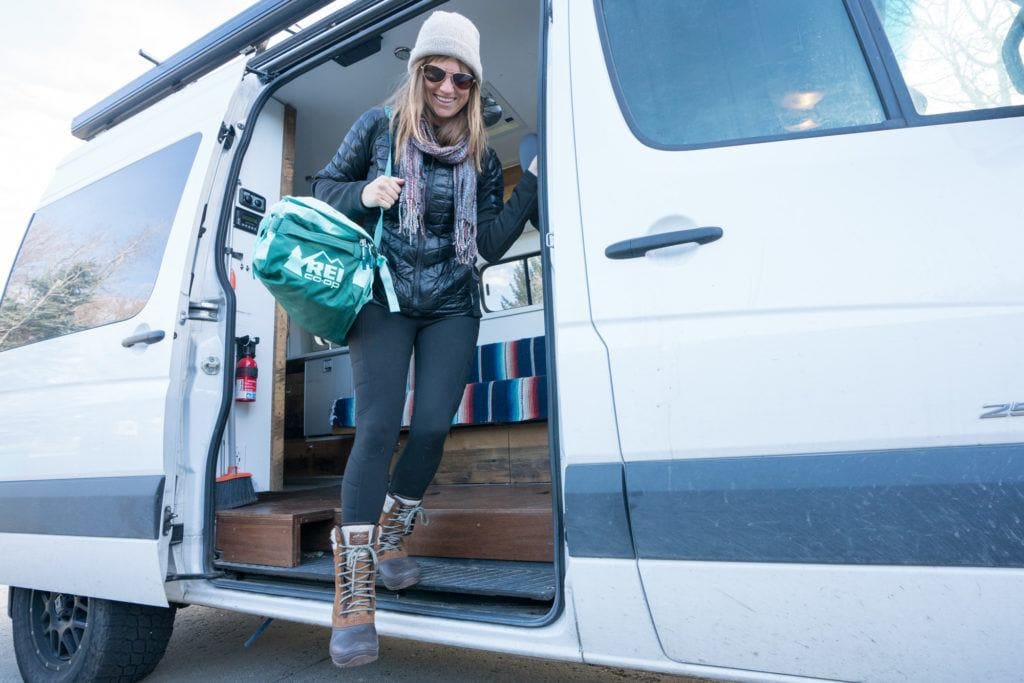
I’ve been doing van life since 2016, and cooking awesome meals in my camper van (or now my adventure truck) is one of my favorite parts of van life. But now that I’m traveling full-time with my son, I’ve had to prioritize meals that are quick, convenient, and easy to clean up. With limited storage space in our rig, I can’t pack everything I’d like, so I’ve pared down our campervan cooking equipment to the essentials we use the most.
In this post, I’m sharing my favorite tried-and-true van life kitchen equipment essentials — the cookware, utensils, and gear that make cooking on the road simple and stress-free. Whether you’re outfitting a new build or upgrading your current setup, these van life cooking essentials will help you eat well without cluttering up your space.
Over the years, I’ve figured out what camper van cooking equipment is actually worth the space — and what we can live without. These are the major appliances I use the most in our van. Some people love having things like a toaster oven or an Omnia stovetop oven (if they cook with gas), but for our setup, this list covers everything we use to make cooking on the road easier.
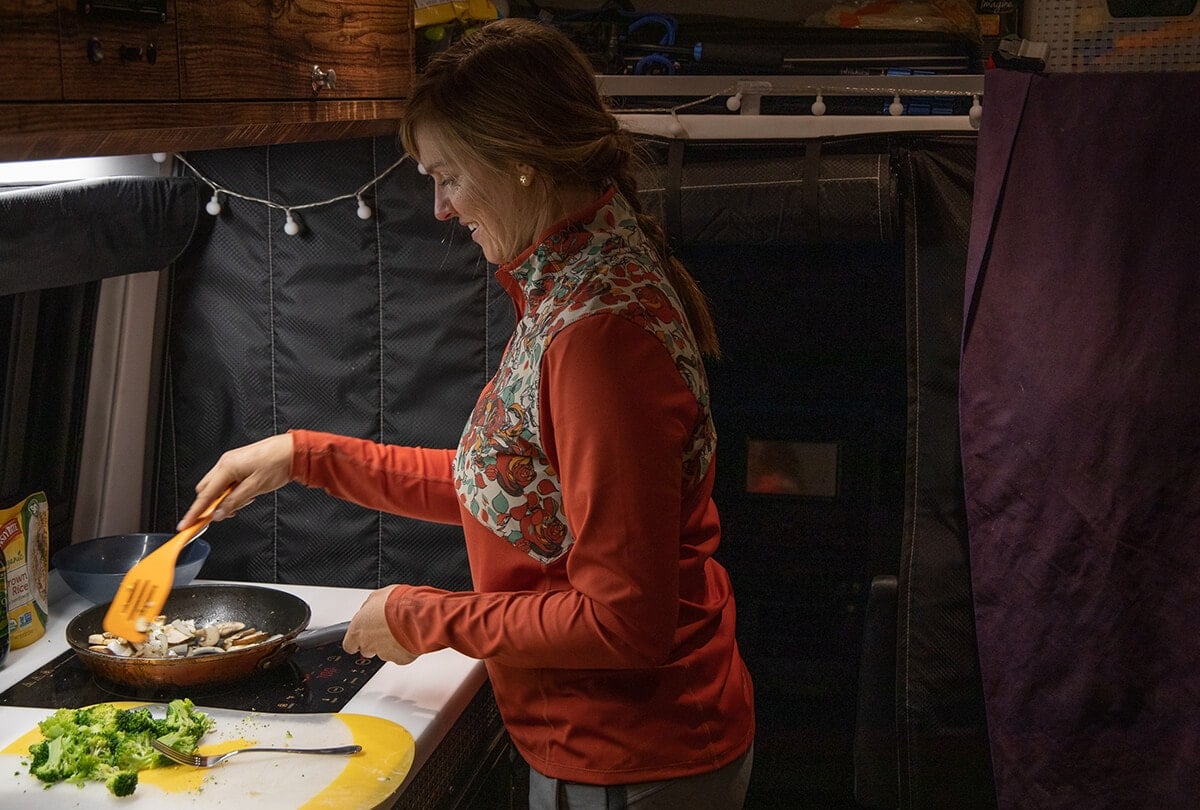
Induction stove: While gas stoves are great for outdoor cooking, an induction stove makes cooking inside your camper van so much easier. There’s no setup required, no hauling ingredients outside, and cleanup is a breeze. Just note that you’ll need a powerful battery system and inverter to run it. I highly recommend avoiding a built-in propane stove — I had one in my first van, and it took up a lot of space, wasn’t the safest option, and was a huge hassle to clean.
Small air fryer: Apart from our stove, our air fryer is the appliance we use most. We have the Instant Pot Vortex Mini (2-quart capacity), and it’s the perfect size for a pack of tofu, which we eat regularly. I also use it for making sweet potato fries, roasting veggies, heating up leftovers, and even toasting bread.
Small Instant Pot pressure cooker: I bring the smallest size Instant Pot in our camper, and it’s a game-changer for quick, hands-off meals. It’s perfect for cooking rice, quinoa, beans, soups, lentils, and one-pot pasta. I love that I can set it and forget it — freeing me up to clean up, play outside with my son, or get some work done while dinner cooks.
Cookware: I use the Magma Nesting Induction Stainless Steel Cookware Set, and it’s been amazing. While this set is heavy, the handles are removable and the pots nest together to save space, and they’re super high quality (unlike most camp cookware). In my experience, the stainless steel holds up better than nonstick. I used to have the nonstick version and the coating got scratched on some bumpy roads.
Microwave: A microwave is definitely a luxury item, but now that we have one in our Rossmonster Baja Trail truck camper, I use it daily. It makes heating up leftovers, milk for my morning matcha, or late-night popcorn quick and easy. I survived eight years of van life without one, but if you have the space and power capacity, it’s a nice convenience to have.
Blender: We brought our big Vitamix, but honestly, it’s too bulky, heavy, and annoying to clean for van life. While I love it for smoothies and homemade hummus, a personal Ninja blender is a more practical choice. It’s compact, easier to clean, and you can eat or drink right out of the blender cup.
Below is a list of the cooking utensils I use most frequently in my camper. I recommend searching for a cooking utensil set that includes most of these items so you don’t have to buy everything separately. Look for food-grade silicone tools — they’re safe, heat-resistant, and easy to clean.
I keep things organized in my drawer with dividers so everything is always easy to find.
Want to make cooking on the road even easier? Download my free list of easy van life meals and must-have pantry staples. It’s packed with simple ideas and ingredients that make grocery shopping and meal planning a breeze — perfect for keeping your camper van kitchen stocked and stress-free.
Dinnerware
When it comes to dinnerware in our camper van, I like to avoid plastic as much as possible. Since we put effort into making good meals, it’s nice to enjoy them on normal-sized plates and bowls instead of tiny, flimsy camping dishes. Here are my recommendations:
4 plates: Even if you’re only traveling with two people, it’s helpful to have four plates so you’re not forced to wash dishes immediately — and you’ll be ready if you have guests. I like the heavy duty RTIC Anywhere Plate Set and lighterweight Hydro Flask stainless steel plates.
4 bowls: These Hydro Flask camp bowls are lightweight, durable, and big enough for a hearty bowl of soup, salad, or cereal.
Insulated mugs: Bring one per person. I use the Yeti Rambler mug — it keeps coffee and tea hot for hours and the lid is really easy to clean.
Extra cups: It’s nice to have a 1 or 2 extra lightweight cups on hand for drinking electrolytes, cold beverages after a hike, or a glass of wine by the campfire.
Silverware: I prefer using regular silverware over camping-specific utensils. It’s heavier, but it’s much nicer to eat with and makes meals feel a little more homey.
Coffee/Tea
Coffee and matcha are on our morning menu in our van. Here’s the van-friendly kitchen equipment we use to get our fix.
Kettle: A small electric kettle is perfect for quickly boiling water for coffee, tea, or instant meals.
Coffee maker (Aeropress): The Aeropress is small, compact, and makes a delicious cup of coffee. It’s also super easy to clean — once you’re done, you just plunge the grounds into the trash and give it a quick rinse. No messy wet grounds going down the drain.
Compact coffee grinder: We typically buy ground coffee since it’s easier, but if you prefer using whole beans, you’ll want a small hand-crank or electric coffee grinder.
Milk frother: I use a handheld milk frother to make creamy, frothy milk for my matcha. It’s lightweight, easy to store, and makes my morning drink feel like a treat.
Loose leaf tea steeper: If you like drinking loose leaf tea, a small tea steeper is a must. It barely takes up any space and makes it easy to enjoy high-quality tea without the waste of tea bags.
Using the Aeropress Go coffee maker in my camper van
Food Storage
When it comes to food storage in a camper van, saving space and keeping things organized is key. I like to use reusable, non-plastic options that are compact, durable, and easy to clean.
Collapsible silicone tupperware: Space is always at a premium in a camper van, and collapsible tupperware is a great solution. When you’re not using them, they flatten down and barely take up any room.
Stasher bags: Stasher bags are reusable, durable, and come in a variety of sizes. They’re perfect for packing to-go snacks for hikes, storing leftovers in the fridge, or even reheating food — they’re microwave-safe and can handle being put in boiling water. Wait until these go on sale though since they are pretty expensive!
Clean-Up
Keeping your van kitchen clean is much easier when you have the right tools. I like to keep things simple with quick-drying towels and compact cleaning gear that doesn’t take up much space.
Quick-dry towel or dish drying mat: When doing dishes, we place a quick dry towel on the counter to lay out the clean dishes off before we dry them.
Dish brush with soap in the handle: Makes washing dishes quick and easy without needing a separate soap bottle.
Eco-friendly dish soap: Using biodegradable, non-toxic soap helps protect the environment — especially when you’re draining grey water outdoors.
Final Thoughts
After years of part-time van life — and now traveling full-time with my son — I’ve learned that having the right kitchen setup can make or break your experience on the road. Keeping it simple, convenient, and easy to clean helps us spend less time dealing with dishes and more time soaking up the places we’re there to explore.
I hope this list of my favorite campervan cooking equipment and van life kitchen essentials helps you feel more confident in building out your own kitchen setup.
If you have any favorite kitchen gear you can’t live without, I’d love to hear about it in the comments.
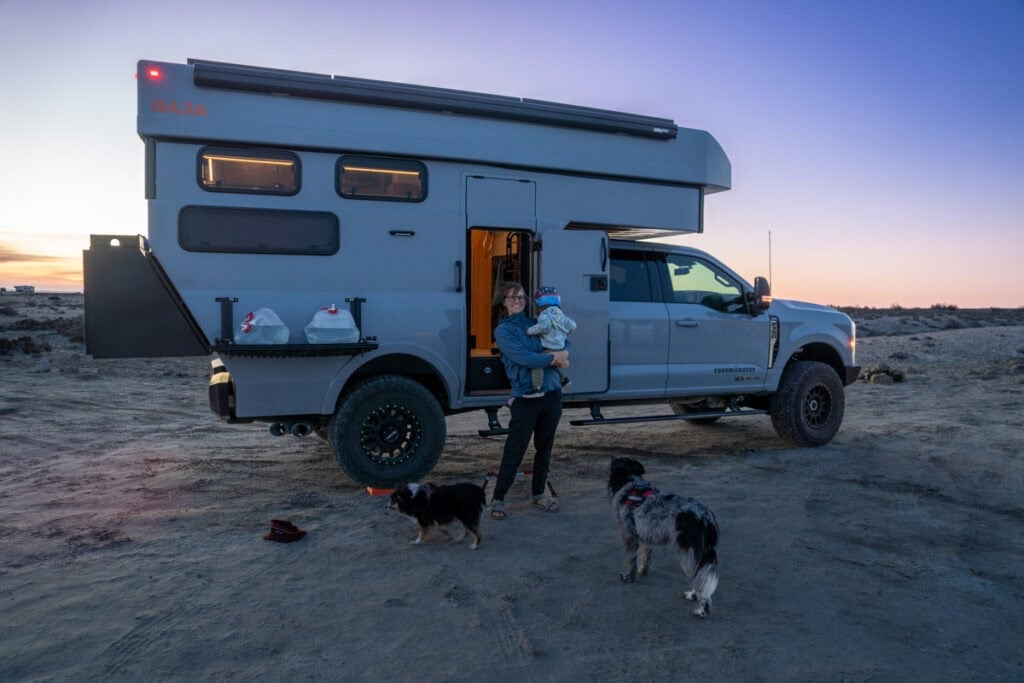
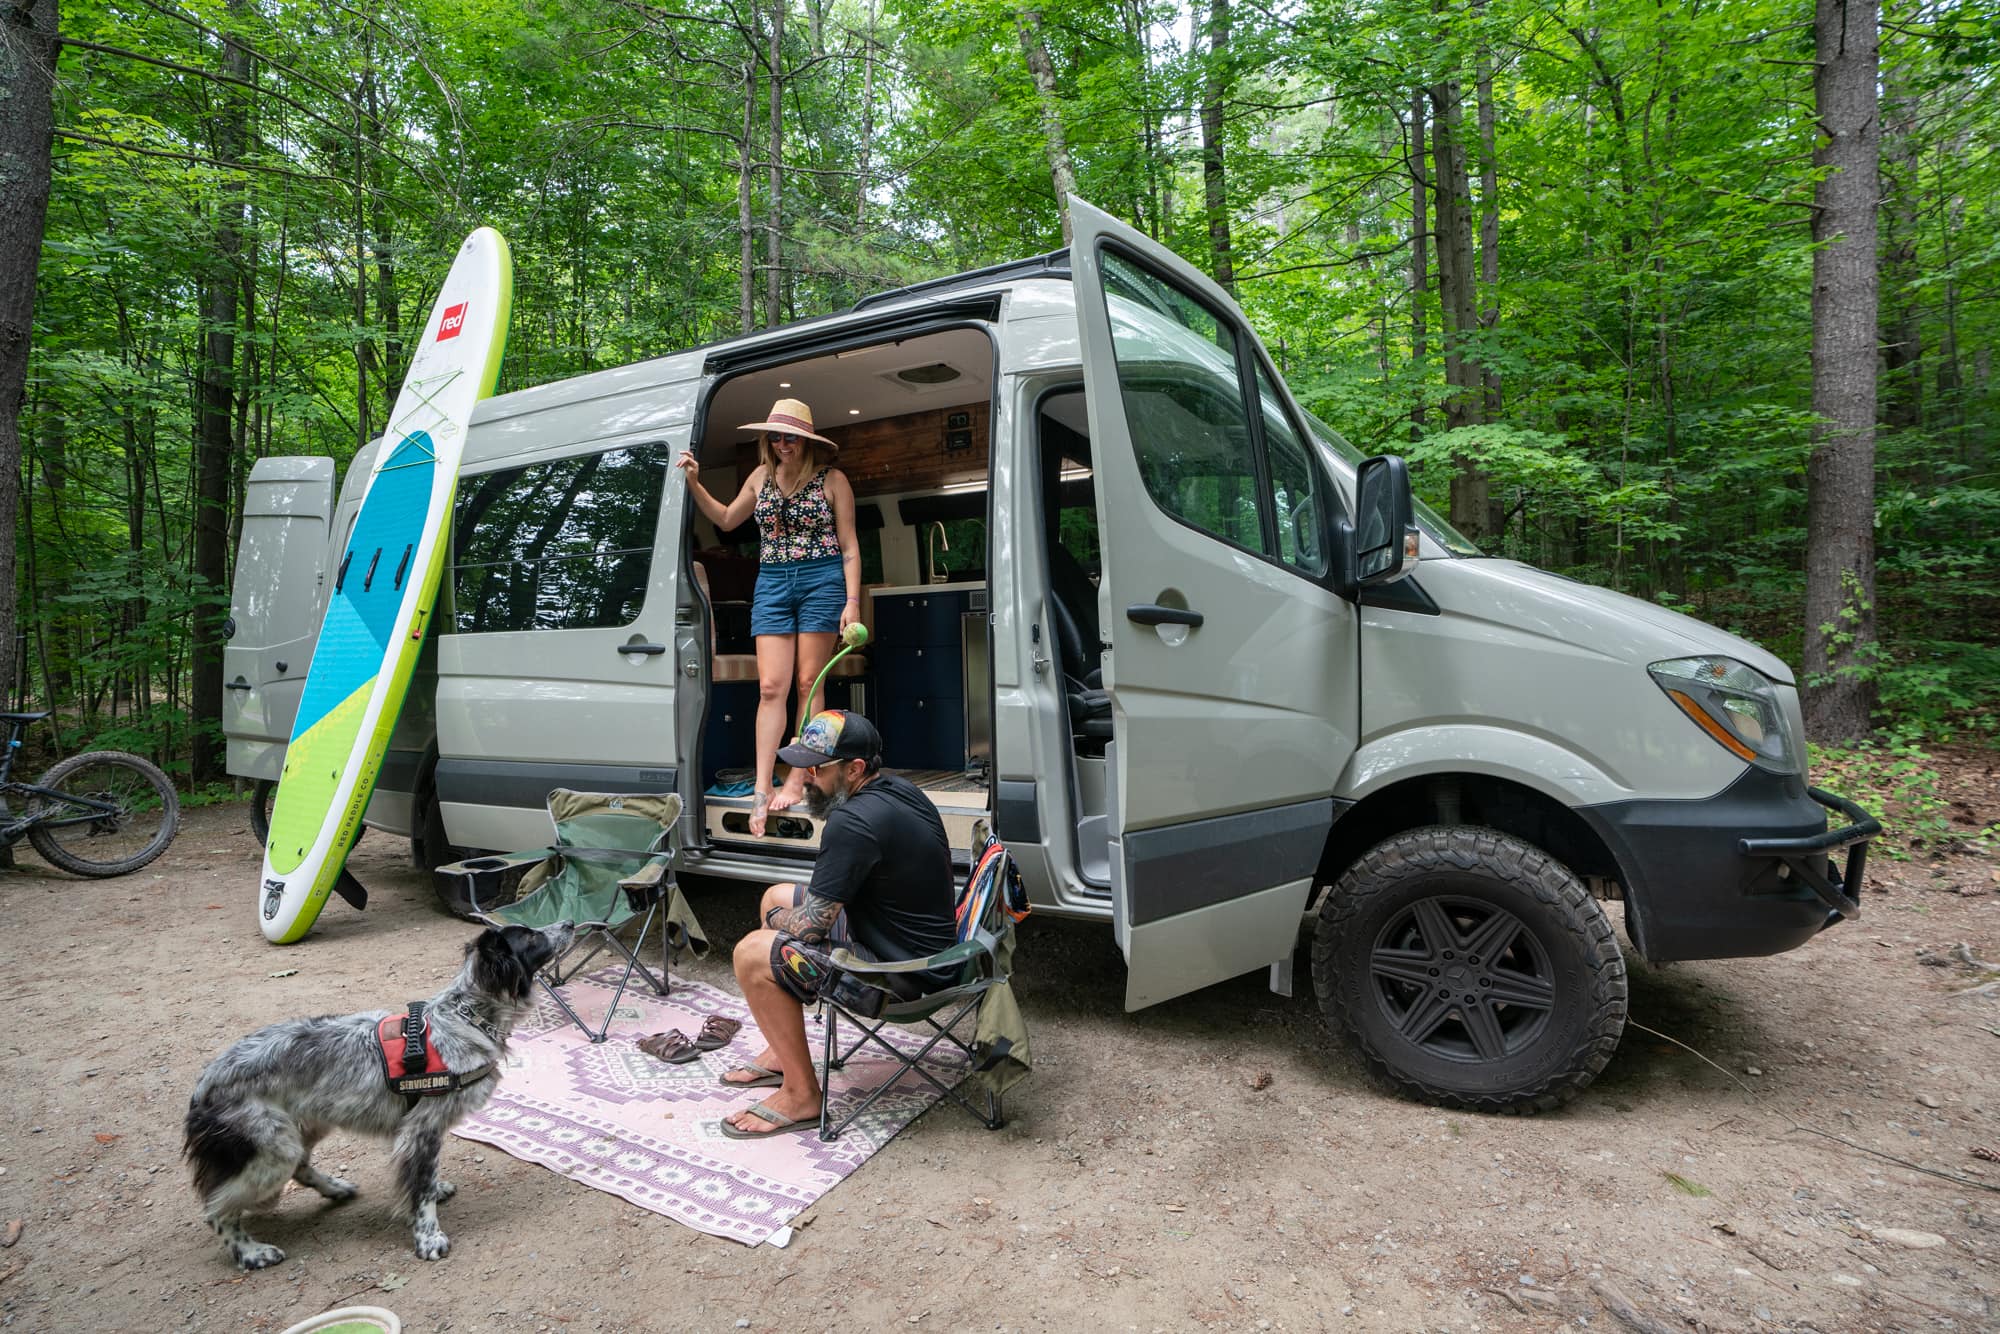
I started van life in 2016 and have since lived in three different Sprinter Vans, logging thousands of days on the road. But after attempting full-time travel with my newborn and two dogs, it quickly became clear that we needed more space to make this lifestyle feel sustainable.
When searching for the perfect adventure vehicle, I wanted something that would give our family of three more functional living space without sacrificing off-road capability or driveability. I didn’t want something so big—like a trailer or a massive slide-in truck camper—that it would limit where we could camp, but I also knew that another van wouldn’t give us the space we needed.
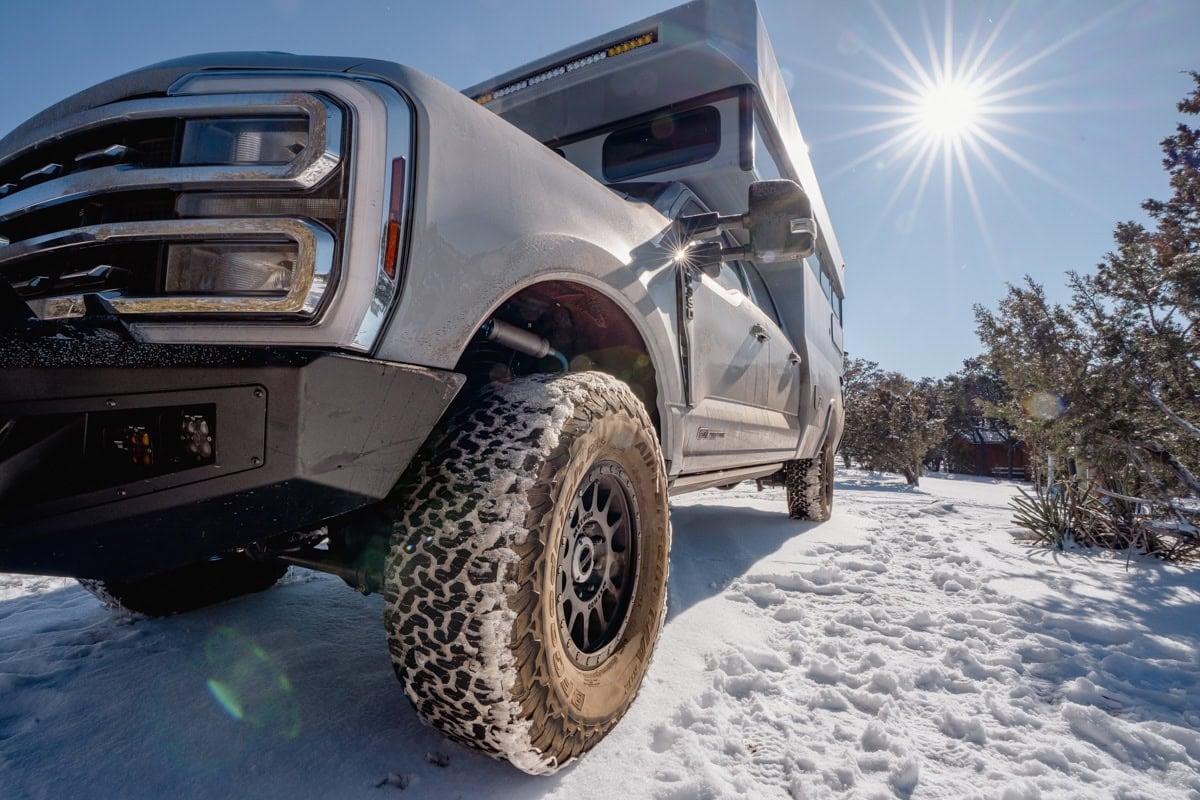
That’s what led me to the Rossmonster Baja Trail—a fully built-out truck camper designed for off-grid travel. It’s built on a Ford F-350 and features a hard-sided pop-top, giving us extra interior space when parked while keeping the truck’s low profile and maneuverability on the road.
I was also drawn to the Rossmonster Baja’s pass-through feature. Coming from a van, I didn’t want to lose the ability to move freely between the driver’s seat to the camper. The layout also seemed very functional — all without feeling cramped — with its two separate beds, kitchen, and full bathroom.
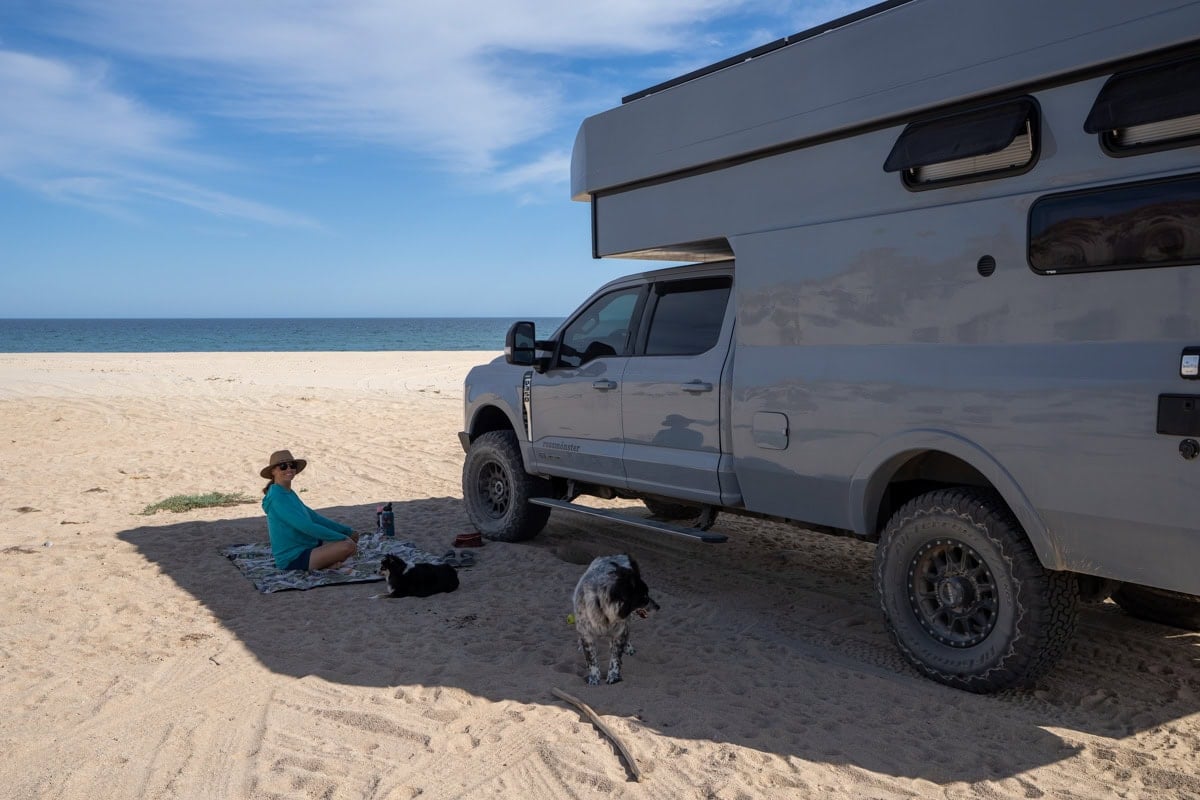
I picked up my Rossmonster Baja Trail in December 2024, and since then, it has become our full-time home on the road. With our house in Utah rented out, we’re fully committed to long-term travel, and so far, we’ve taken the Baja Trail through Arizona and all the way down to the bottom of Baja California. I’m excited to share all the little details—the things I love, what surprised me, and a few things I’d tweak.
If you’re considering a Rossmonster Baja Trail, this review will help you decide if it’s the right fit for you. If you have any questions, shoot me an email or message me on Instagram. If you do reach out to Rossmonster, let them know I sent you—they’ll take great care of you!
I love how the inside of my Rossmonster Baja turned out!
Ford F-350 Chassis
The Rossmonster Baja Trail is built on the Ford F-350 chassis, and I expected it to feel massive and intimidating to drive. I was so wrong—this truck drives like a dream.
One big appeal of the Ford chassis for me was knowing that we could get it serviced almost anywhere, even in rural areas and small mountain towns across North America. If we ever run into trouble, there’s a good chance we’ll be able to find a mechanic who can work on an F-350. That peace of mind was a huge factor in choosing this platform for long-term travel.
The Rossmonster Baja can be built on either the 6.7L Power Stroke V8 Turbo Diesel or a gas engine, but I chose the diesel because it’s more powerful and has extra torque which helps carry the weight of the camper. The diesel also gets slightly better fuel economy and has greater towing capacity should we ever decide to tow anything. Finally, diesel engines are built to last longer than gas engines, meaning it will hold its value longer.
Driveability
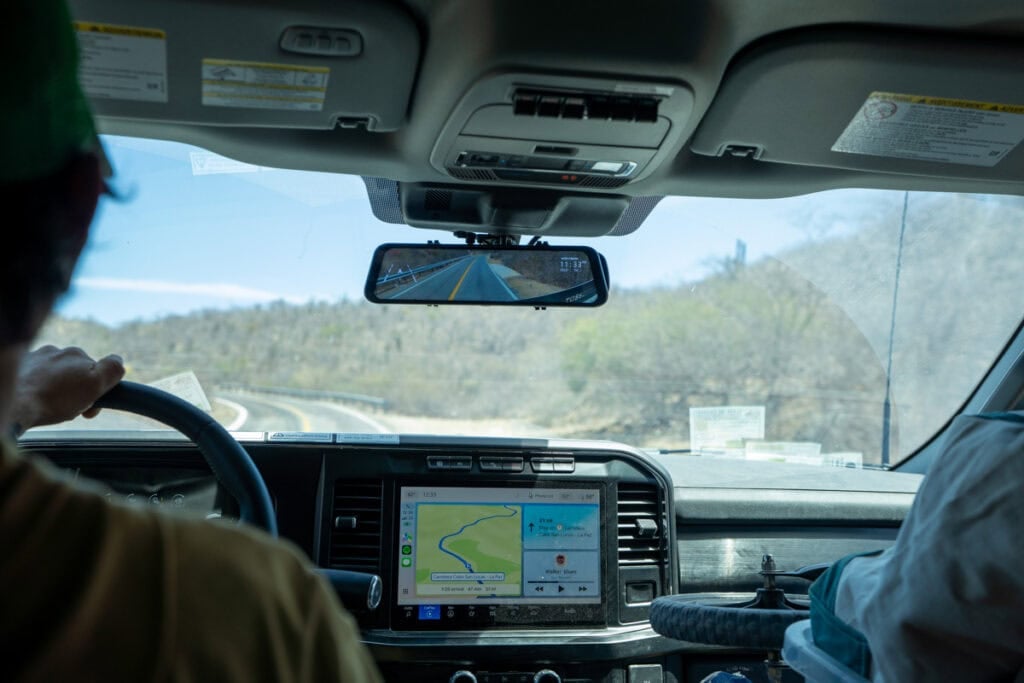
The Rossmonster Baja Trail accelerates quickly, even with the fully built-out camper on the back. I thought it might feel heavy and sluggish, but the turbo diesel engine is very powerful. We never feel like we’re struggling to keep up on highway passes.
The turning radius is surprisingly good, and despite its size, I can still maneuver in tight parking lots without feeling too stressed. The steering is smooth and responsive, making it much easier to handle than I anticipated.
The Baja comes with two backup cameras—one factory-installed that displays on the dash screen and a Wolf Box camera that replaces the rearview mirror, showing a constant live feed of what’s behind the truck. Having this full-time rear view makes lane changes and merging way safer since I always know what’s around me.
The truck also comes with a factory camera that shows the front of the truck from the bumper’s point of view when 4×4 is engaged. This makes it much easier to see rocks and ruts in the road when we are exploring dirt trails.
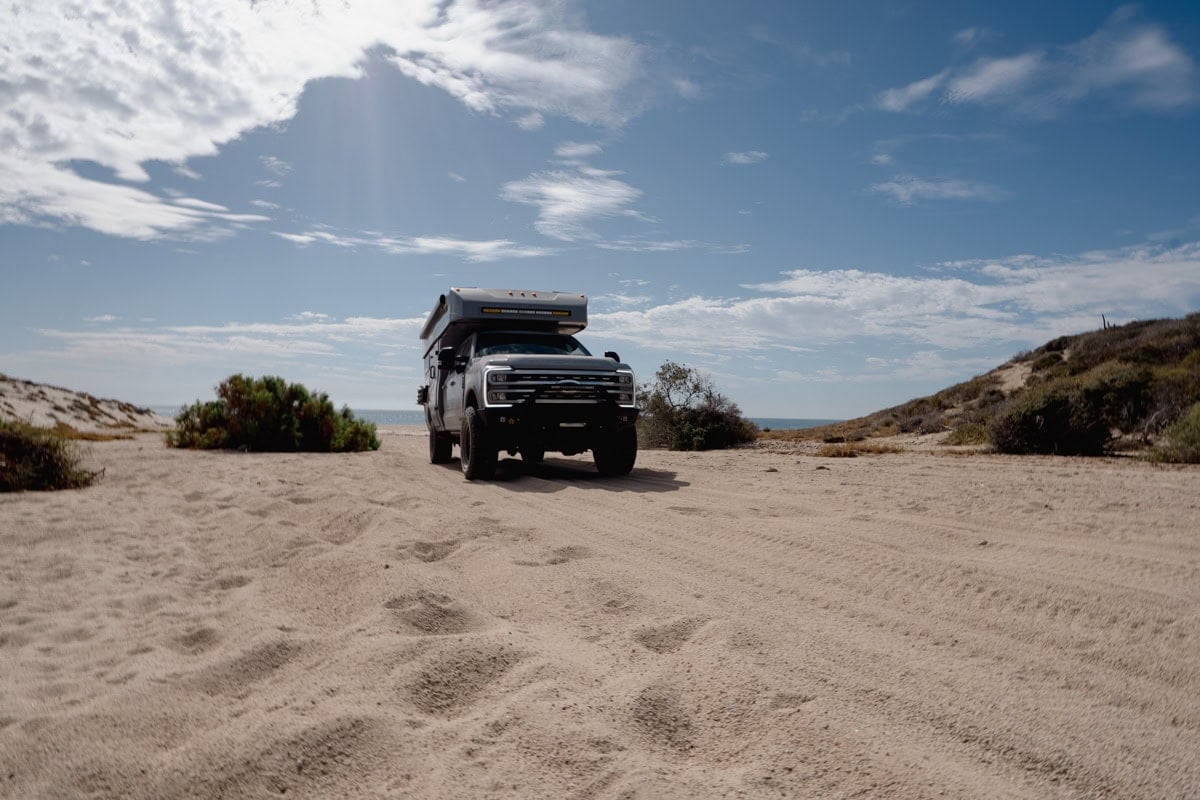
Off-Road Capability & Suspension
One of the biggest priorities when choosing a new rig was off-road capability. After years of pushing our Sprinter Van to its limits (and probably taking it places we had no business going), I wanted a rig that was at least as capable—if not more—when it came to tackling rough terrain and accessing remote trails.
With beefy tires, a low center of gravity, and a suspension specifically tuned for off-road performance, the Rossmonster Baja feels just as comfortable on the highway as it does on rugged backroads. We’ve tested it on beaches, rocky roads, and rough desert terrain, and it has handled everything impressively well.
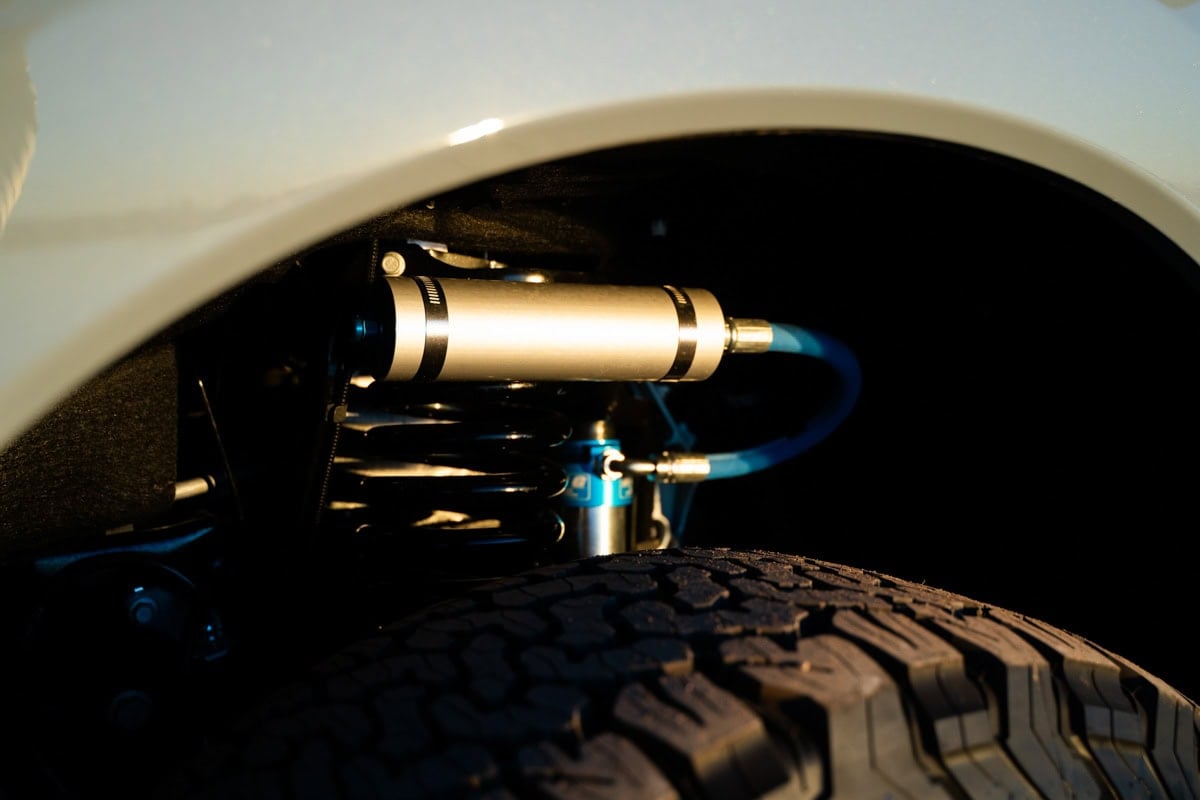
Wheels and tires – The Baja comes standard with Method Race wheels and 37-inch BF Goodrich all-terrain tires. These provide a smooth ride on the highway, solid traction in bad weather, and impressive grip off-road.
Carli Pintop suspension – This suspension is specifically tuned for the weight of the camper, making the Baja feel smooth and responsive both on and off-road. Between the upgraded shocks, low profile, and low center of gravity, body roll is minimal, and the truck feels stable in wind at high speeds and on uneven terrain.
Camper Shell Construction
The Rossmonster Baja is built with a fiberglass composite shell and an aluminum frame, designed to be lightweight and durable. The big advantage of fiberglass is that it’s easy to repair if we were ever to get any dings or dents in the camper shell. Just about any body shop in the U.S. should be able to fix it.
On top of that, the shell is a single-piece construction, meaning there are no seams to worry about leaking or failing over time.
So far, the build quality has exceeded my expectations. The camper feels solid, well-built, and thoughtfully designed, and the interior is holding up incredibly well, even after driving rough roads down in Baja California. The materials and finishes are durable and functional, with no rattling or shifting while driving.
Hard Walled Pop-Top
Before discovering the Rossmonster Baja, I was hesitant about a pop-top camper. Traditional soft-sided pop-ups come with a few big drawbacks—they lack insulation for four-season use, they stay wet if you have to close them in bad weather, and they can’t support overhead cabinets, which I absolutely wanted for storage.
At the same time, I didn’t love the idea of a traditional slide-in truck camper either. Most of them are over 13 feet tall, which significantly limits where you can go, especially when it comes to tree clearance and off-road trails.
The Baja’s hard-sided pop-top solves all of these problems.
Lower driving height: The Baja is 9’11” when driving and 11’1″ when fully popped up, making it much more manageable than a traditional truck camper while still offering full standing room at camp
Fully electric operation: To lift the pop top, you just press a button, and in 45 seconds, the roof is up. No manual cranking, no heavy lifting.
Supports overhead storage: Unlike soft-sided pop-ups, the hard walls allow for overhead cabinets offering a lot more storage.
Still functional when closed: With 5 feet of interior height when the roof is down, we can still grab a snack or use the bathroom without having to lift the roof.
Fully insulated: The solid walls provide four-season insulation. This also reduces food smells, which will be great for trips to bear country.
Triple sealed: The pop-top has three different layers of seals that ensure that no dust, bugs, or light enter the top while it is up, down, or while we are driving.
Here we are parked next to a Four Wheel Camper soft-sided pop-up built on an identical chassis
Interior Layout Overview
The layout of the Baja is one of the biggest reasons I chose this camper, and now that we’ve been living in it full-time, I can confidently say it works incredibly well for our family.
The width of the F-350 (about a foot wider than a Sprinter) makes a huge difference in livability—we all have room to move around without constantly bumping into each other. The high ceiling (6’5” when popped up) makes the space feel open and even my tallest friends can stand up straight inside.
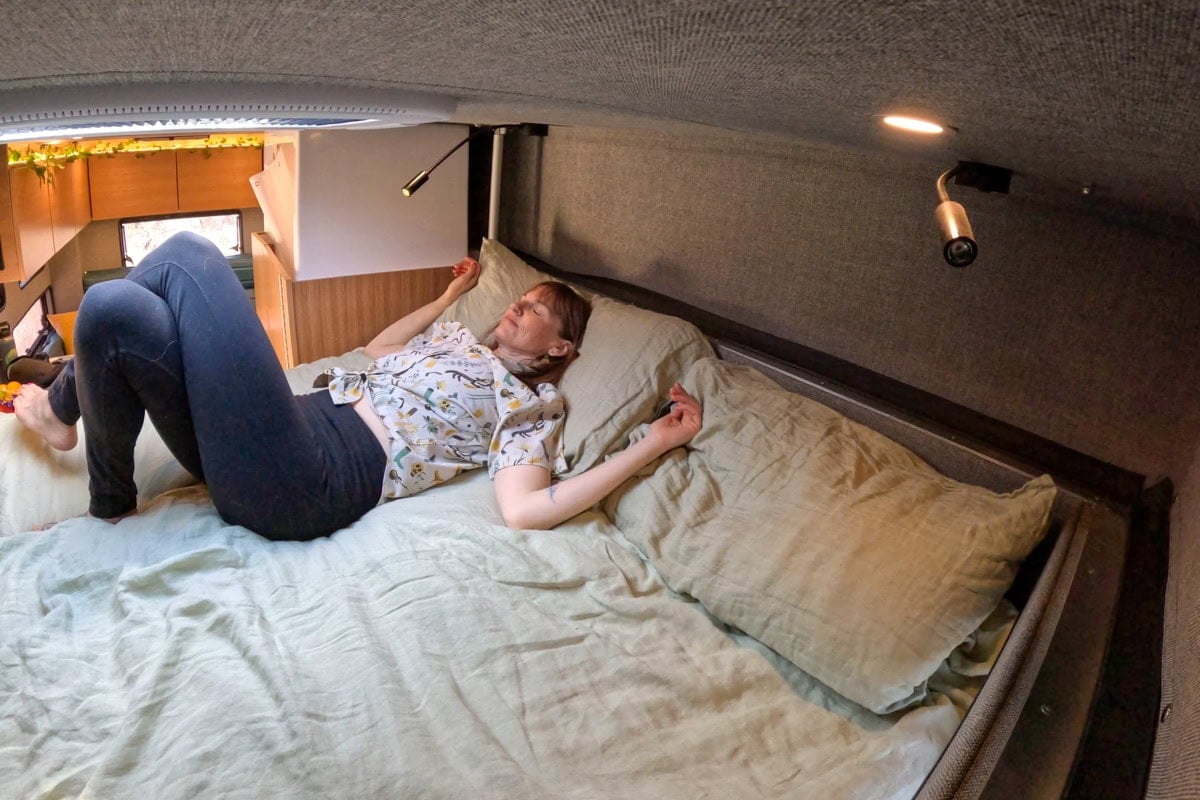
Cabover Bed
When you step inside the side door, our bed sits above the cab. At 59″ wide by 74″ long, it’s about the size of a queen bed, giving my partner and me (plus our two dogs) enough space to sleep comfortably. The mattress it came with is fairly comfortable, but I added a 2-inch latex topper for extra cushion, which made a big difference.
The headspace in the bed is 32″, which is just shy of letting me sit up fully. However, there’s a skylight above the bed that adds about 6 extra inches of headroom when you’re positioned underneath it. I do wish there was a bit more vertical space, but since our bed is just for sleeping and watching our iPad at night, it feels plenty adequate for that purpose.
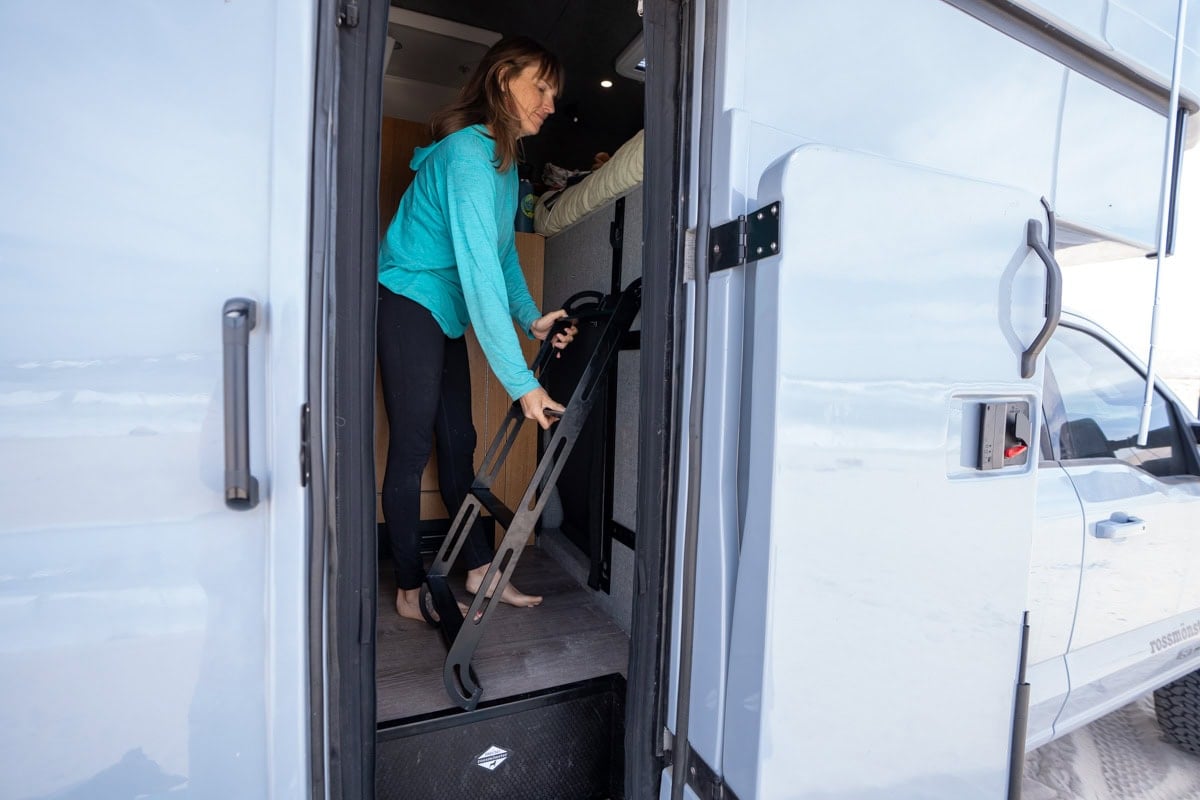
To get up in the bed, you use the ladder that stows flush against the wall when it’s not in use.
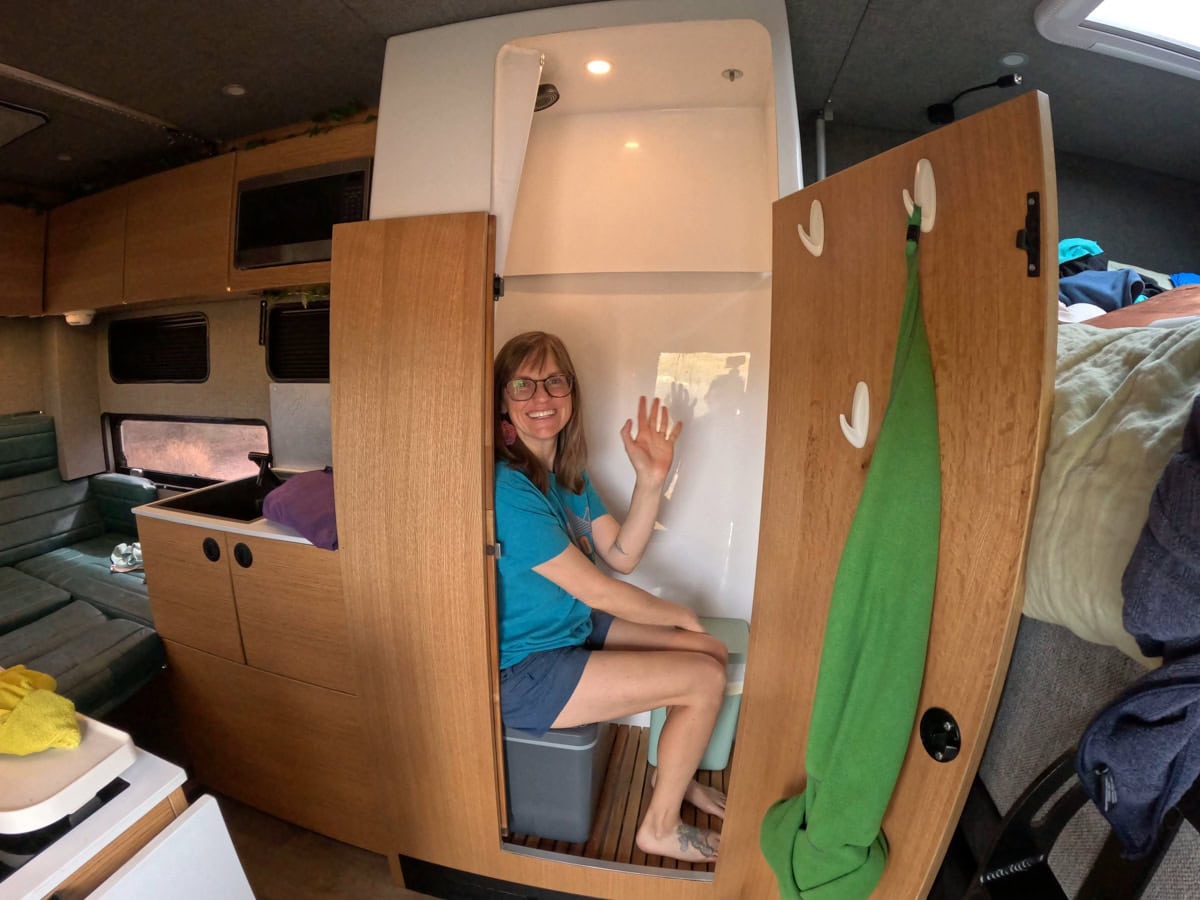
Full Bathroom
The Rossmonster Baja Trail LX is the floor model that comes with a full bathroom, including a shower and toilet—something I didn’t have in my last two vans. I only had 25 gallons of water in my vans, but in the Rossmosnter, I have a 40 gallon water tank. So having a shower in here makes a lot more sense, especially now that I have to worry about bathing a toddler on the road. With so much water, we can take showers without stressing about running out of water for drinking, cooking, or dishes.
The bathroom feels surprisingly spacious for a truck camper. I can sit comfortably on the toilet without my legs touching the wall, which isn’t always the case in smaller RV bathrooms. The shower height is 6’2″, so most people can stand up straight without having to hunch over too much. The shower head is detachable and has an on/off switch, allowing you to direct the spray exactly where needed while conserving water.
The shower has a slatted teak floor above the shower basin, which allows dirt and grime to rinse down while keeping your feet out of any standing water. Grey water drains into an 11-gallon tank, which has been enough for us to manage with regular dumping.
For hot water, the Baja uses a hydronic heating system. It takes about 5-10 minutes to heat up, but once it’s ready, you have unlimited hot water.
We went with the Trelino separating toilet, which has a pee canister and a waste bin lined with a bag that can be tossed in the trash. I like the bag system, but the toilet itself has room for improvement. The good news is it’s fully removable, so if I want to try a different toilet, it’s an easy swap.
I’m so glad we have a full bathroom (the LX model), but if you don’t need one, the Baja also comes in an EX model that prioritizes additional counter space and storage. Instead of a dedicated bathroom, it features a toilet tucked inside a small cabinet and a folding shower that sets up in the middle of the camper when you need a quick rinse. Both models also have an outdoor shower hookup that’s connected to the hot water lines.
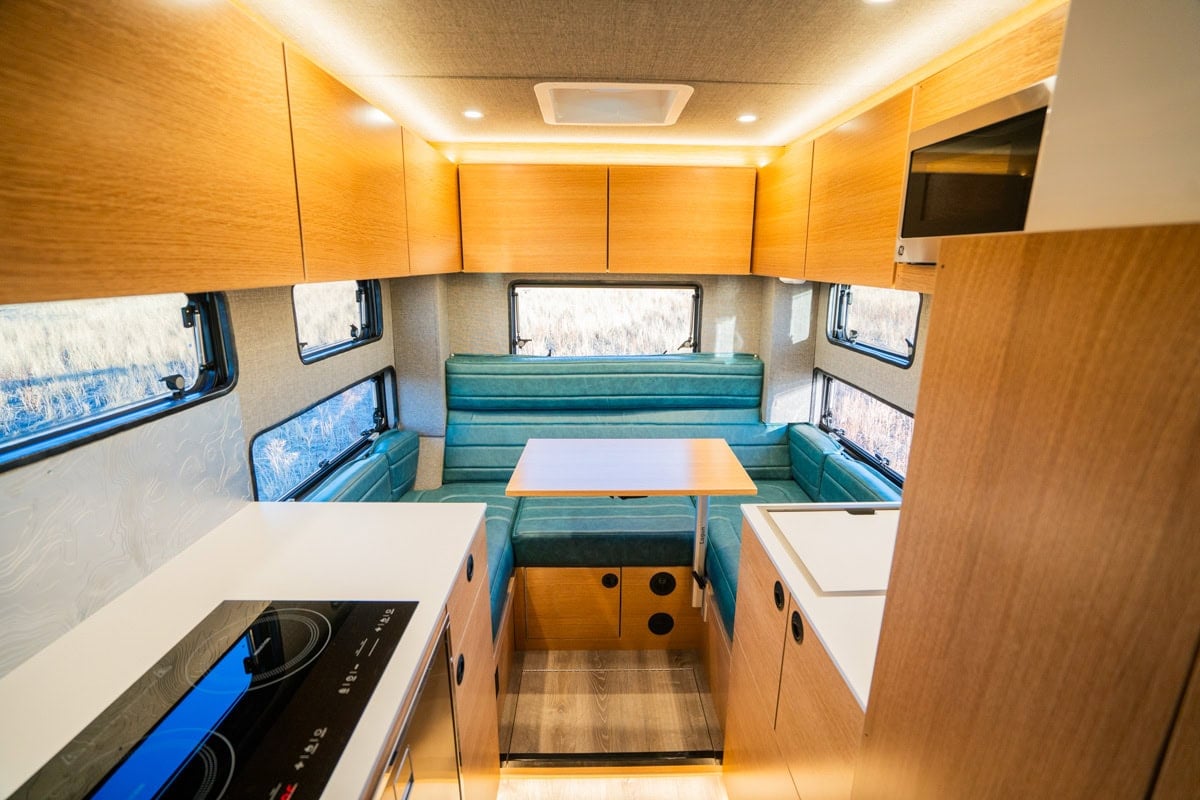
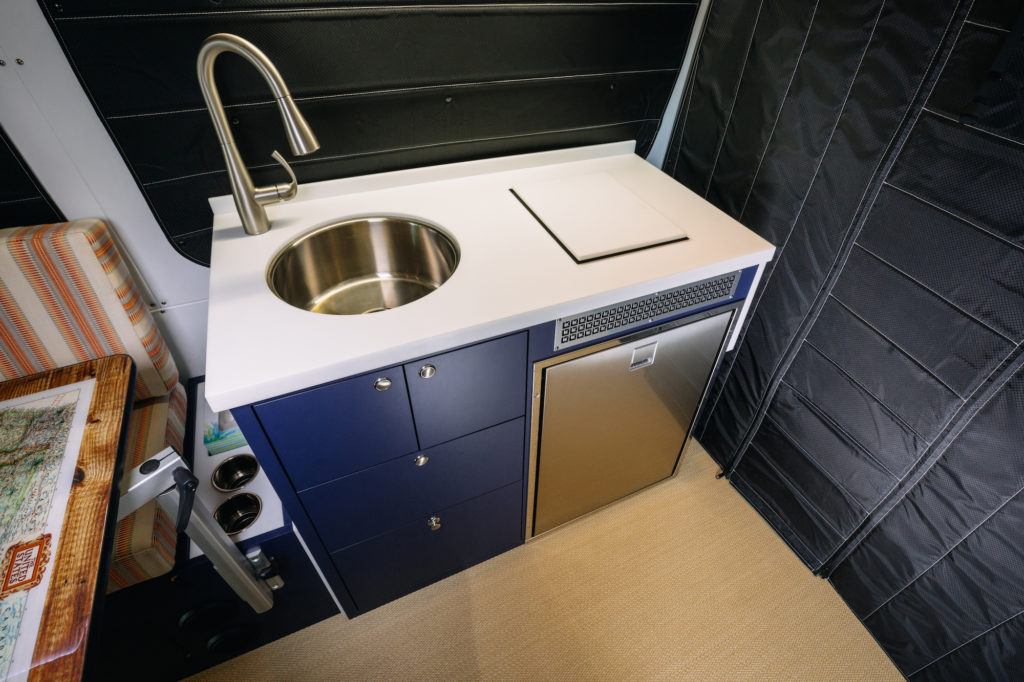
Kitchen
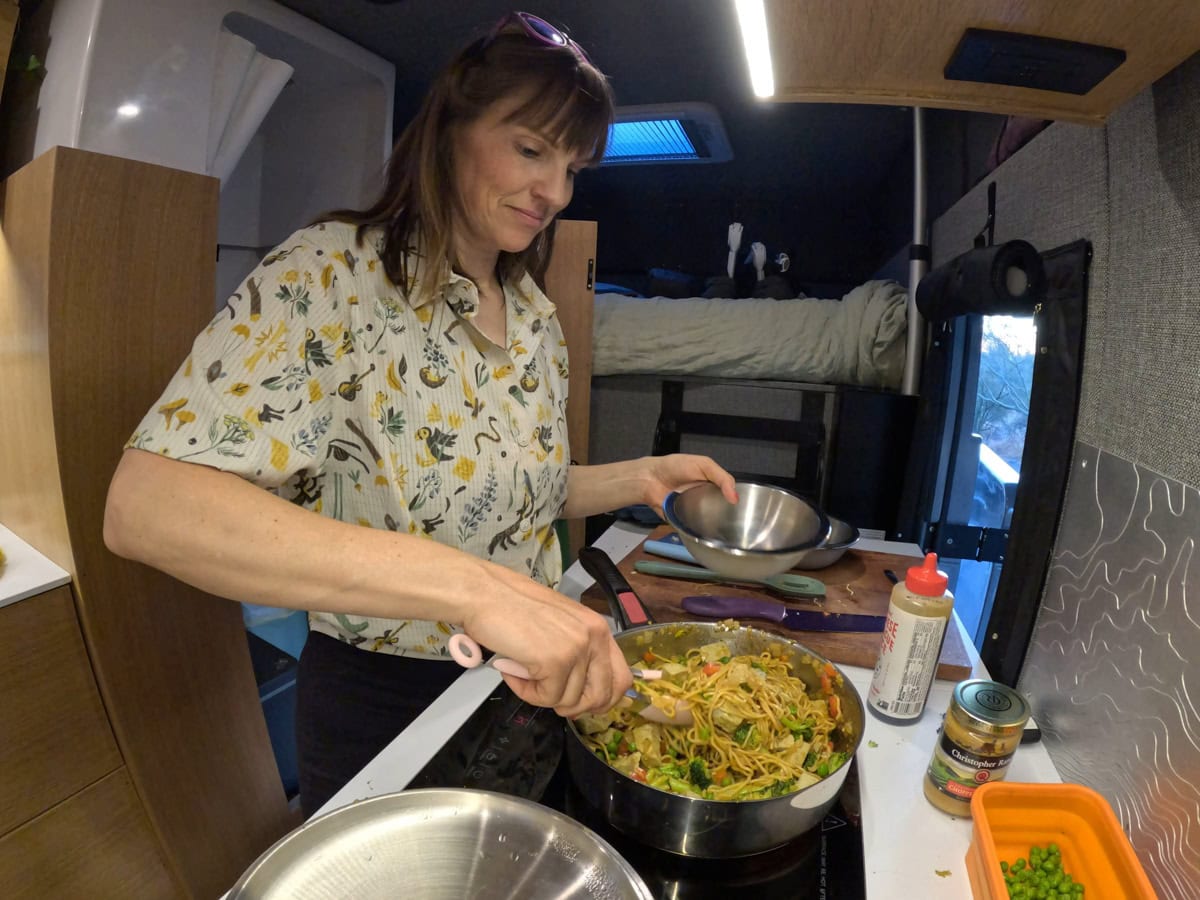
The kitchen in the Baja LX floorplan is split galley style, with counter space on both sides, a two-burner induction stove, a fridge, a sink, and an additional flip-up counter next to the stove.
With two burners on the induction stove, I left our portable propane camp stove behind. While I do miss cooking outside occasionally, it’s one less piece of gear to carry, and we don’t have to deal with carrying propane. The induction stove boils water fast, easily wipes clean, and cools down quickly after use, so it’s not a lingering hazard in a small space.
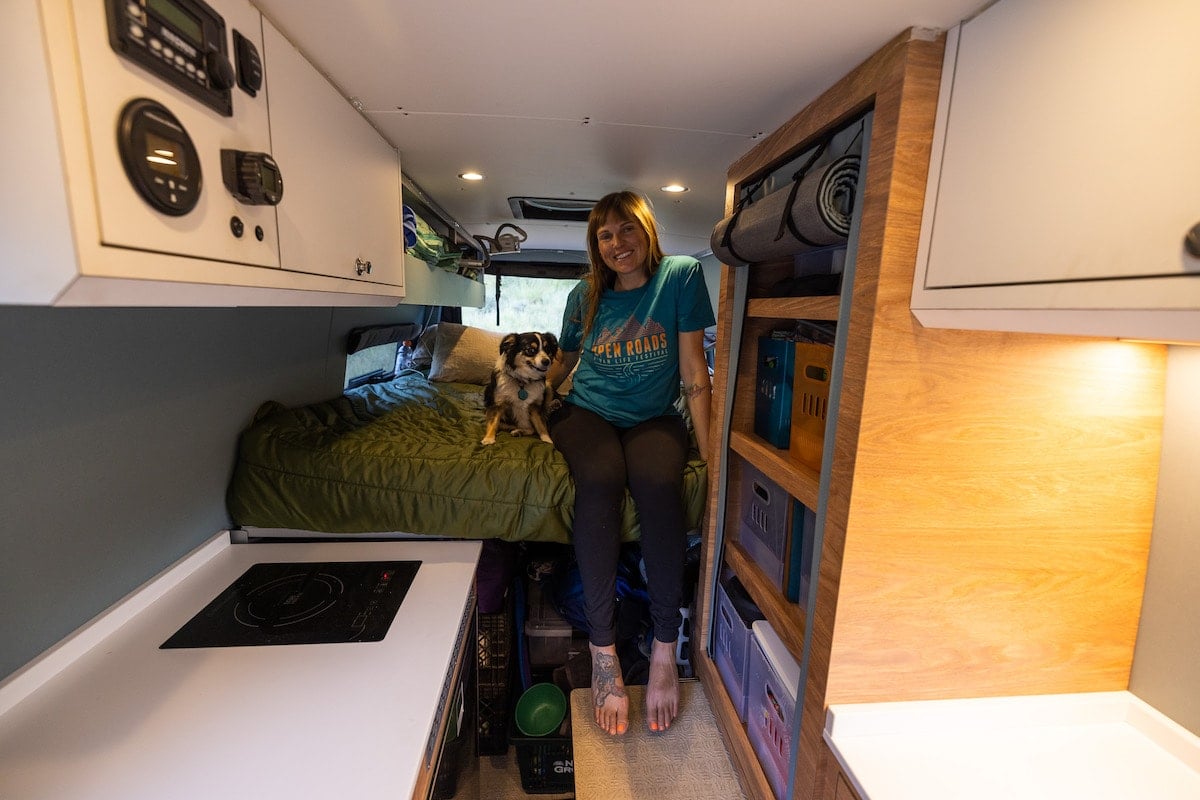
The Isotherm Cruise Elegance fridge holds about a week’s worth of food. I’ve had this exact fridge in all of my van builds (it’s one of the industry’s most popular fridges), and while it works well, my biggest issue is that the freezer ices over monthly. Defrosting it requires pulling out all the food, which can be a hassle when there’s nowhere else to store it. Other than that, I don’t have any complaints.
I also love the spacious sink, which makes doing dishes easy. The faucet stows down while driving, so there’s no risk of it shifting or leaking. A custom cutting board fits over the sink, doubling as extra counter space when needed—a thoughtful touch that helps maximize functionality in a small kitchen.
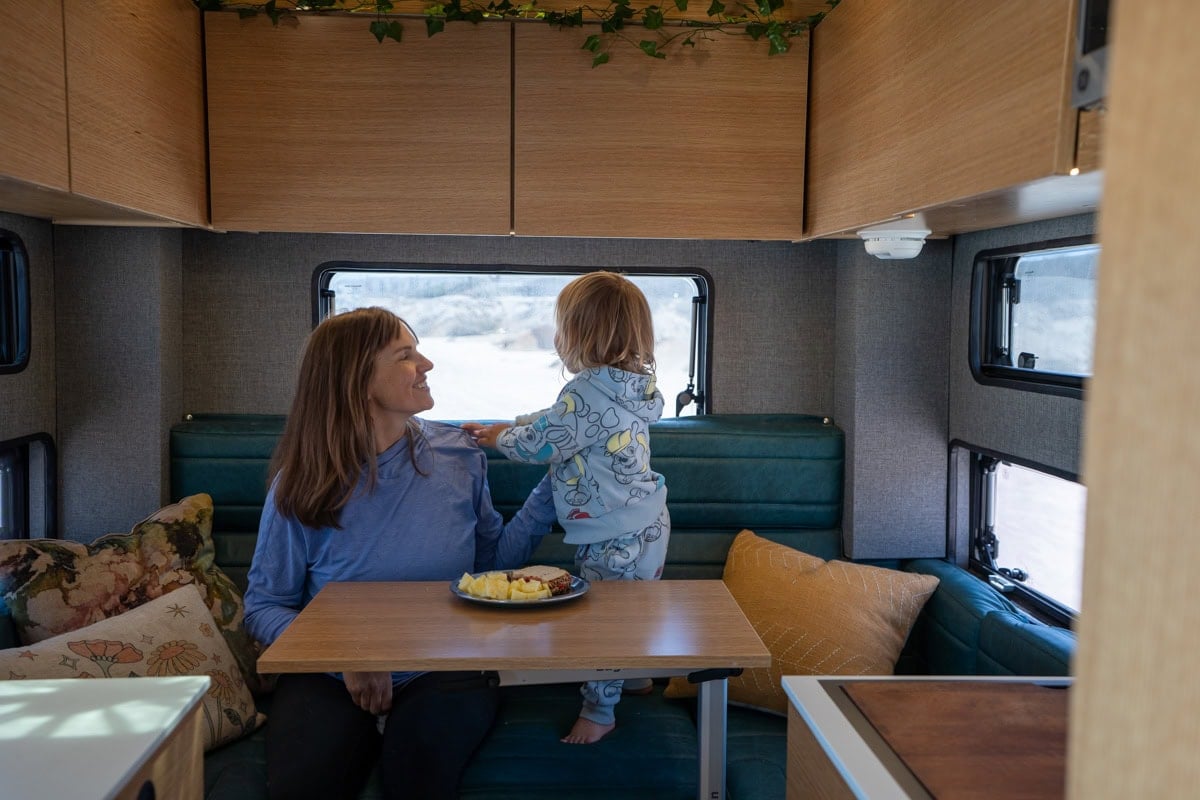
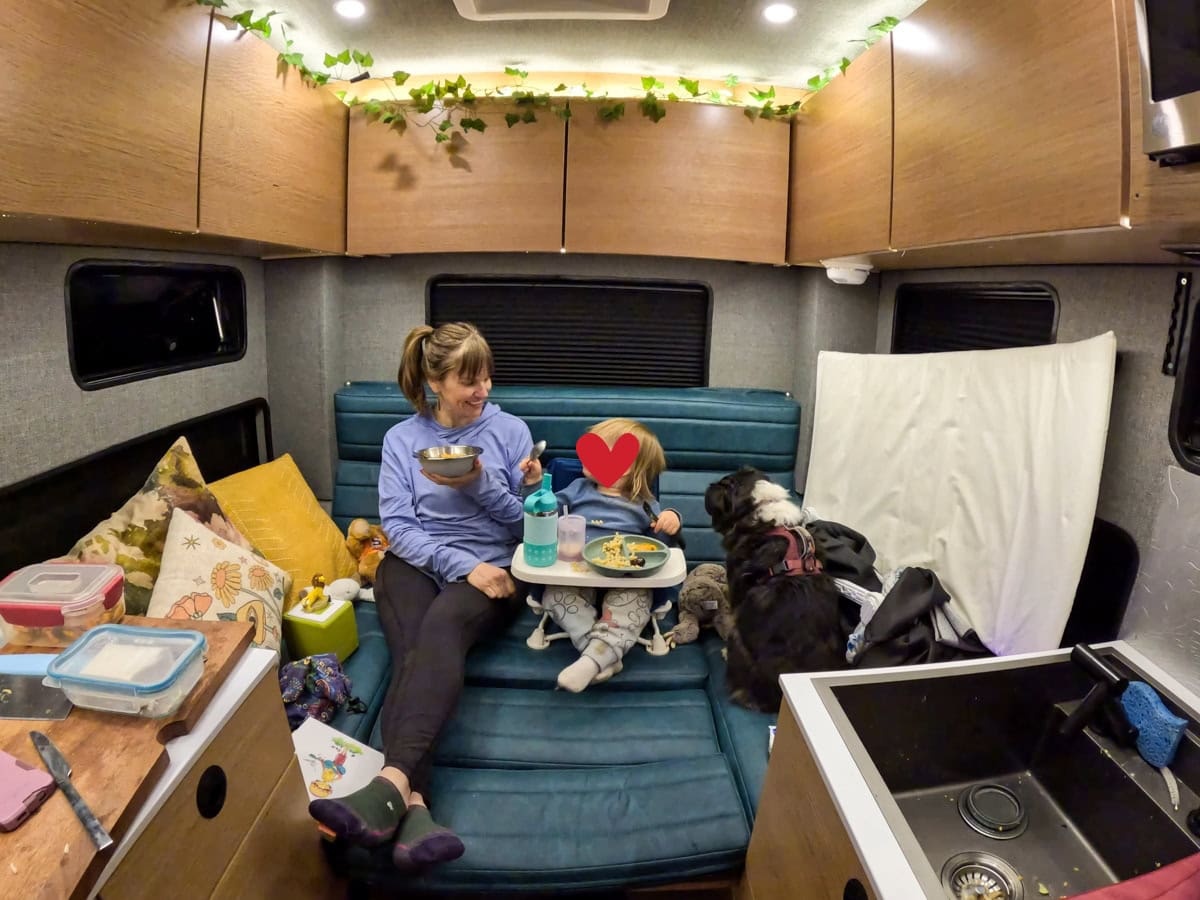
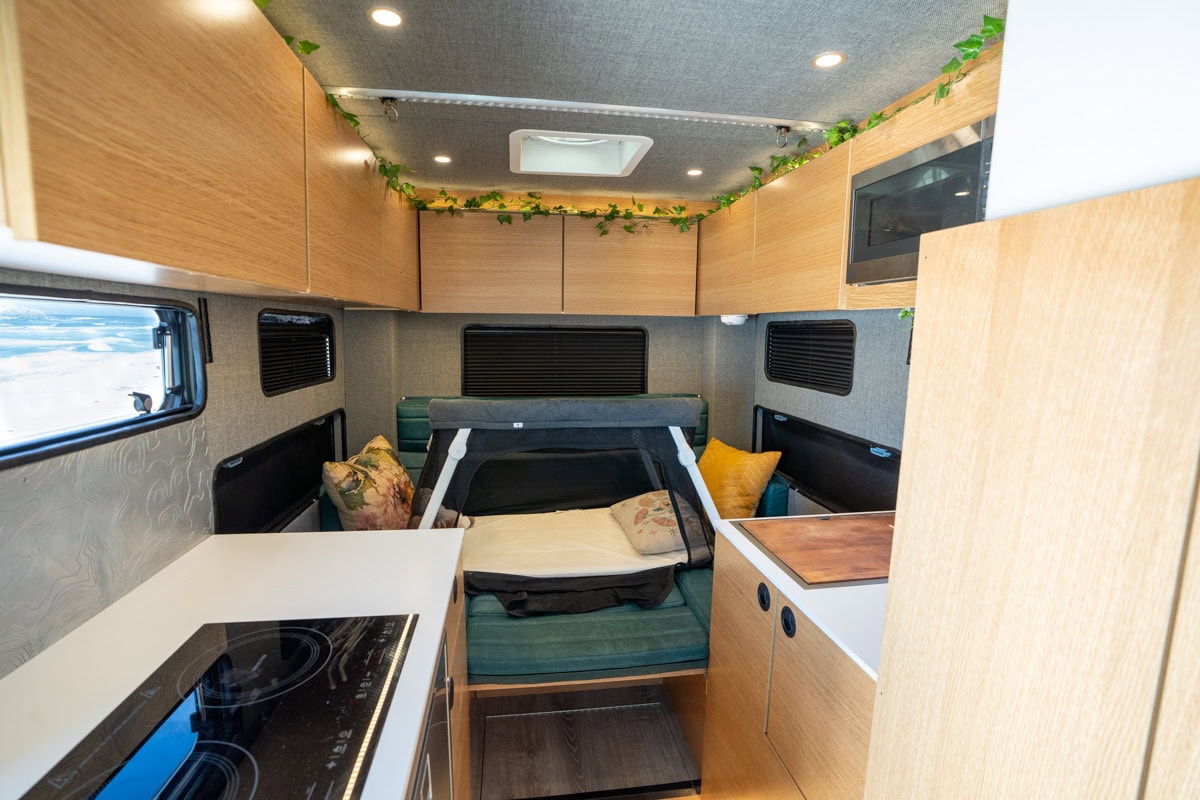
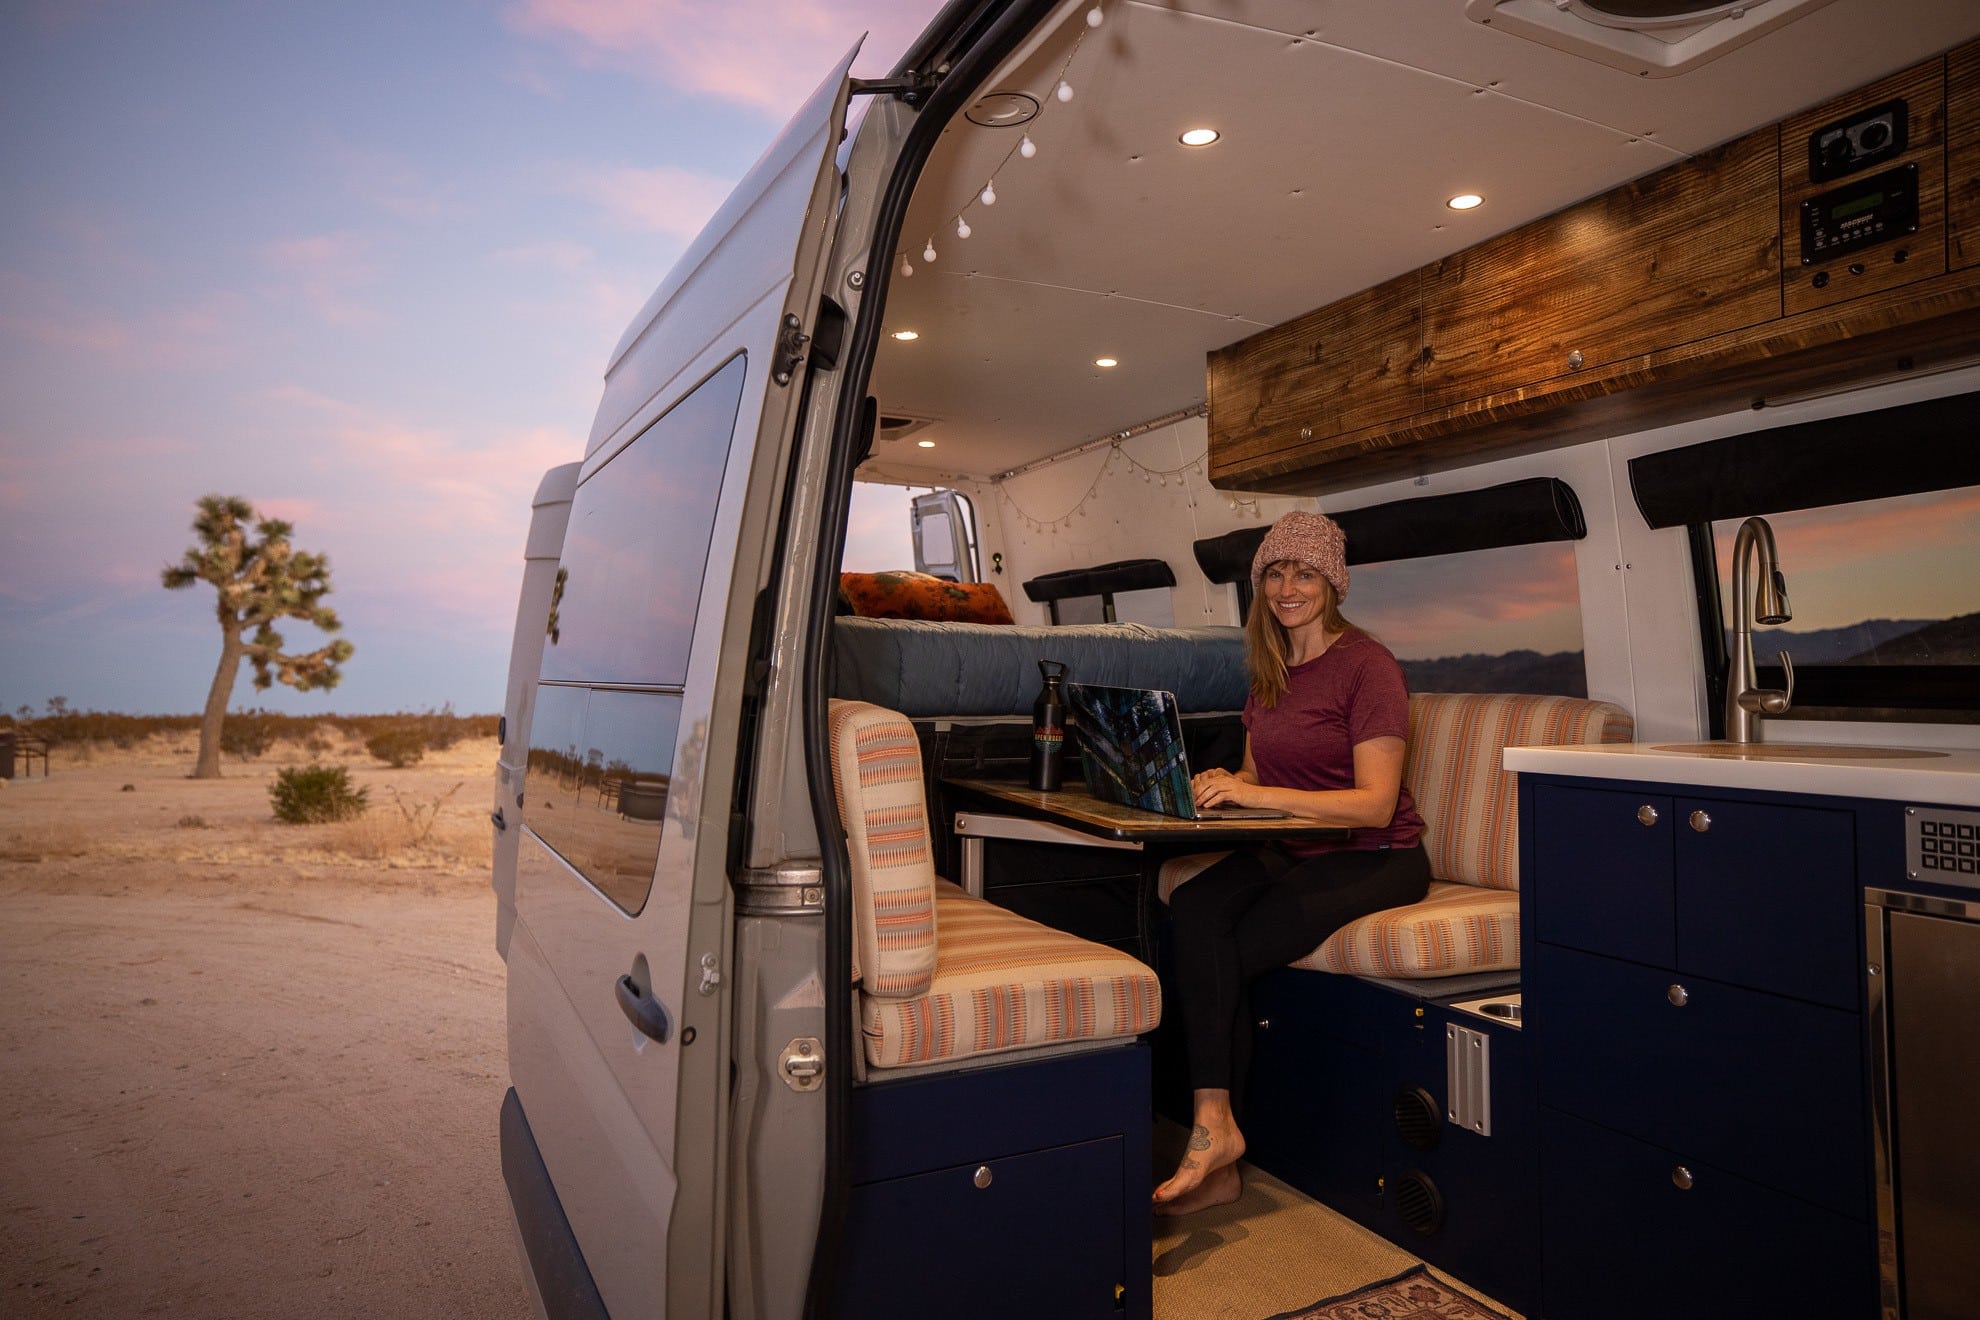
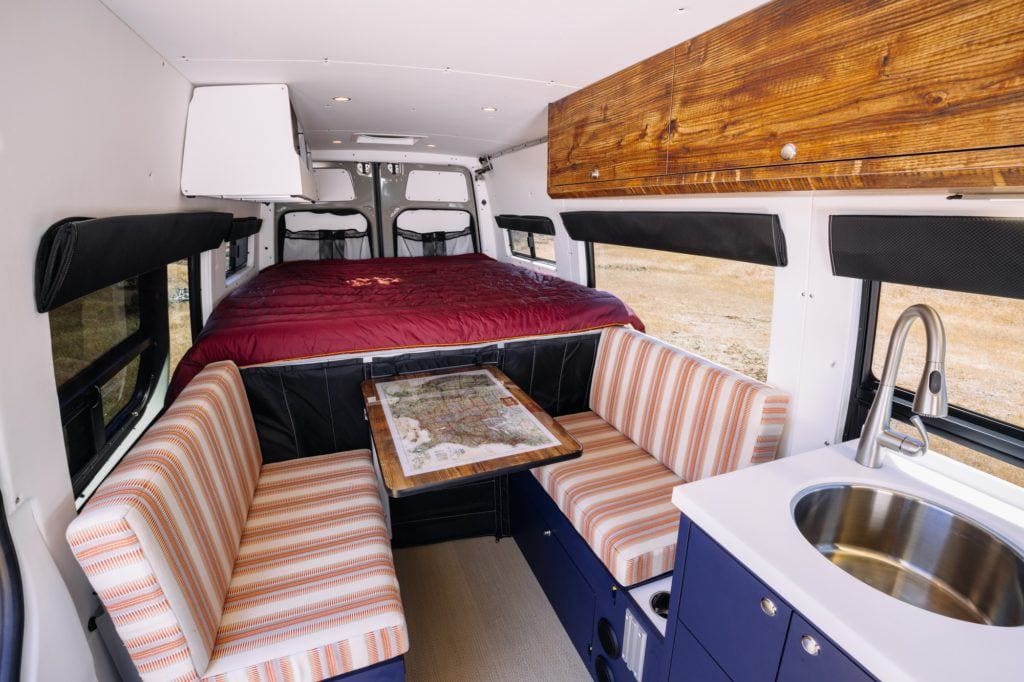
Dinette / Second Bed
At the very back of the camper, the dinette serves as both a functional workspace and a comfortable lounge area. It comfortably seats four, making it perfect for meals, working, or just relaxing. The table is mounted on a Lagun swivel system, allowing you to quickly move it out of the way when needed. The seating is surprisingly supportive, and I can work on my laptop for hours without dealing with back pain—something I couldn’t say about all my previous setups.
When it’s time to convert the dinette into a bed, the process takes about two minutes. The tabletop drops down onto a pair of slats, and two of the side cushions fit on top to create a large, flat sleeping surface.
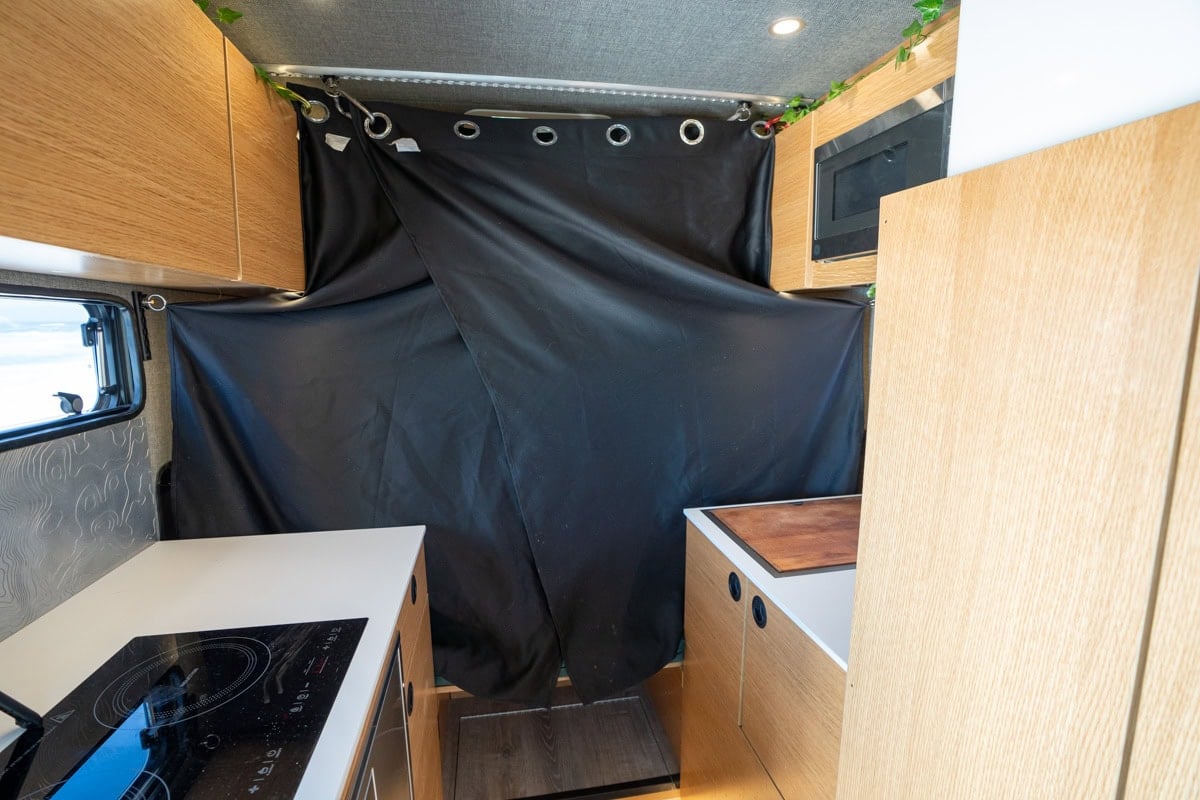
This second bed is big enough to fit my son’s travel crib right on top, and we installed L Track on the ceiling to hang a blackout curtain, giving him his own private sleep space. When he’s not sleeping, the bed mode creates a huge, comfortable lounge area where we can all hang out, read, and play together. It’s one of the most versatile parts of the camper and has made full-time life on the road much more enjoyable.
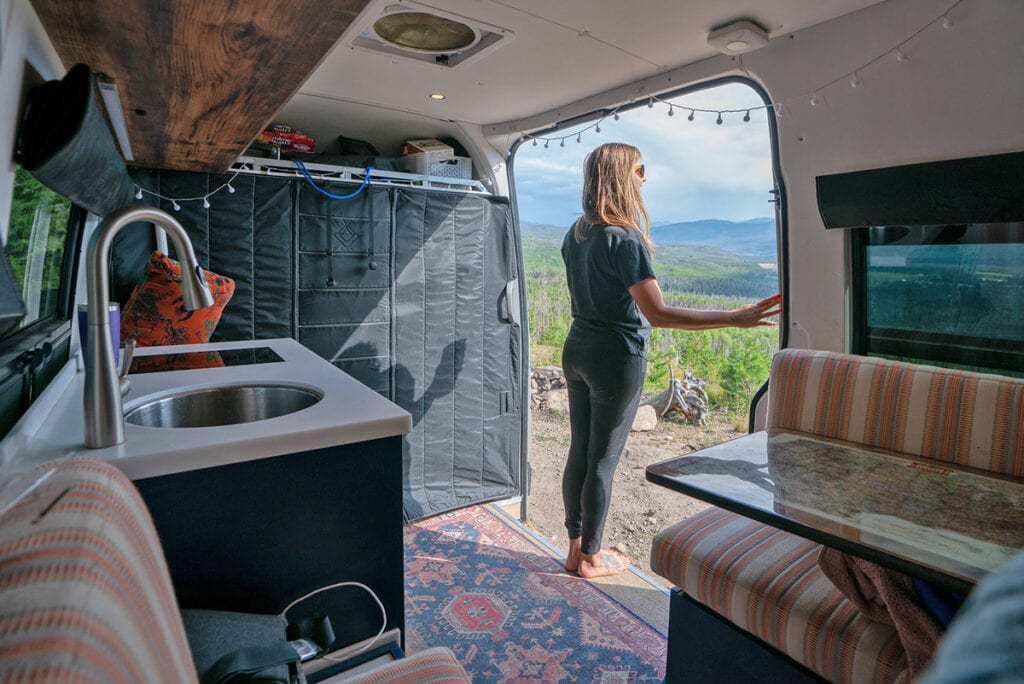
Pass-Through
Coming from a van, I didn’t want to lose access to the driver’s seat while inside the camper. When I first started van life in 2016, I was traveling solo, and being able to hop into the driver’s seat without stepping outside was one of the main reasons I chose a van over other types of campers. It made me feel safer, knowing I could drive away in an emergency without exposing myself to whatever was outside.
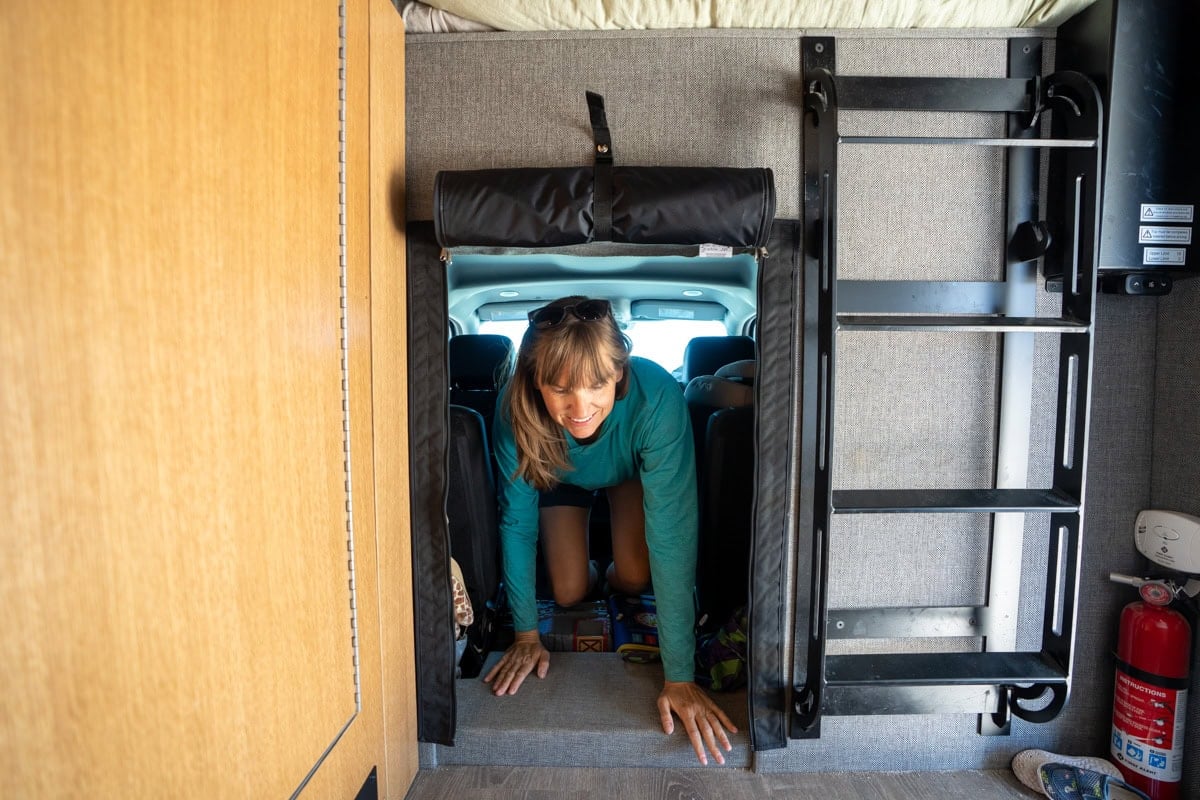
When I started looking at truck campers, I realized that very few models offer a true pass-through. The Rossmonster Baja is one of the rare exceptions. Between the back seat of the truck cab and the camper, there’s a 24” x 36” pass-through, which, while not big enough to walk through like I could in my Sprinter, is plenty large enough to crawl through easily. It gives me that same peace of mind I had in my van, knowing I have quick access to the driver’s seat if needed.
Beyond the safety aspect, I use the pass-through all the time for passing gear between the camper and truck cab. When it’s time to hit the road, I can easily pass water, snacks, my son’s toys, or anything else we need up front without having to step outside, which makes getting ready to go quicker.
My son loves climbing through the pass-through when we are camping, turning it into an extra play space. The dogs use it too. This is really helpful if we have to park and leave them in the truck for a bit, they can go to the back of the camper where it’s insulated and doesn’t get nearly as hot as the truck cab. The pass-through is one of those features I didn’t want to compromise on, and I’m really glad we have it in the Rossmonster.
Storage
I was initially worried about losing storage space compared to a van, and I won’t say I don’t miss the huge garage we had under our Sprinter bed. But with the combination of interior storage, extra space in the truck cab, and the gear boxes on the back, I’ve found there’s plenty of room for all of our essentials, even for full-time living. If you’re traveling part-time, it would be even easier to make it work.
Here are the major storage areas in the Baja Trail:
Overhead cabinets – Surprisingly spacious and perfect for storing food, dishes, and my work gear. These cabinets wrap around the camper and hold more than I expected.
Large kitchen cabinet – Big enough for all of our cookware. We fit pots and pans, an Instant Pot, a small air fryer, an electric kettle, a Vitamix, and Tupperware, all in one space.
Slim cabinet next to the bathroom – A great spot for toiletries, first-aid supplies, and miscellaneous small items we want easy access to.
Clothing storage – Two large cabinets span across the bed, providing plenty of space for all of our clothes. I get one side, and my partner gets the other, which makes it easy to keep things separate.
Truck cab – If you don’t need all the seats, the cab becomes a massive extra storage space. Up there, we keep a bin with all of our shoes, backpacks, my son’s Strider bike, and other frequently used gear. It’s easy to access and keeps clutter out of the camper.
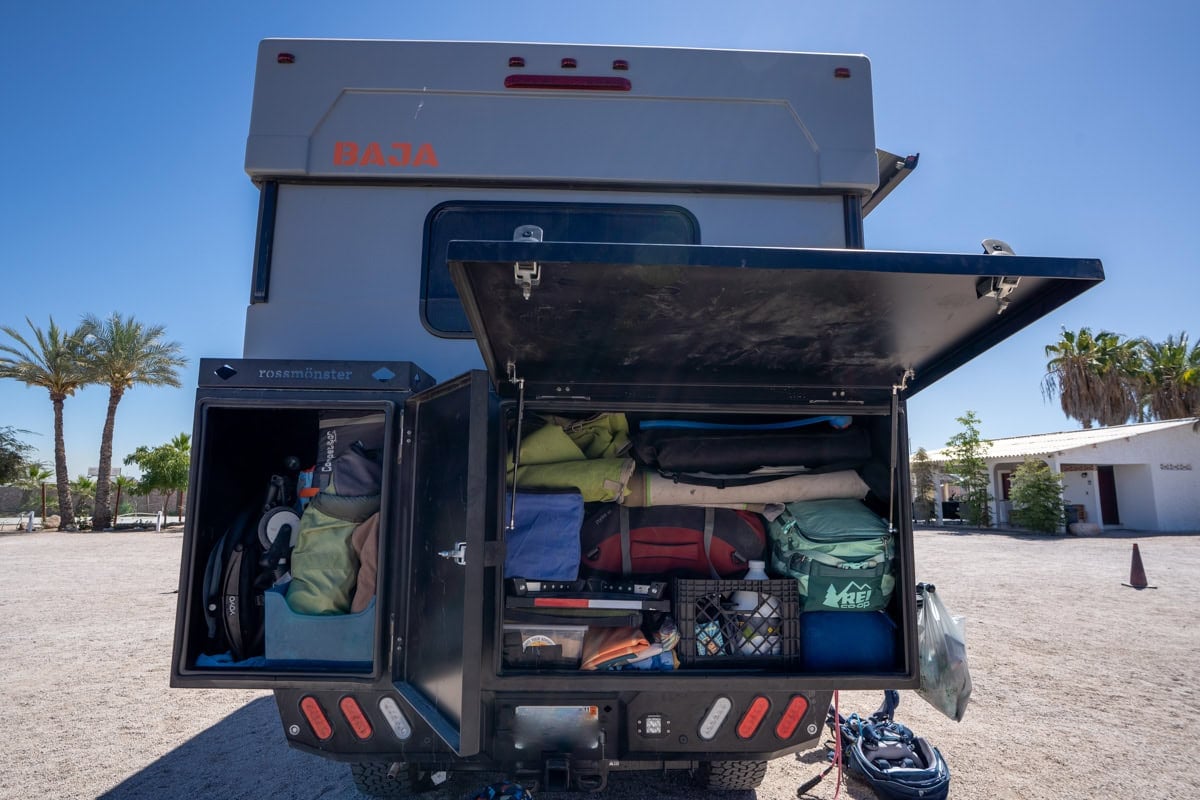
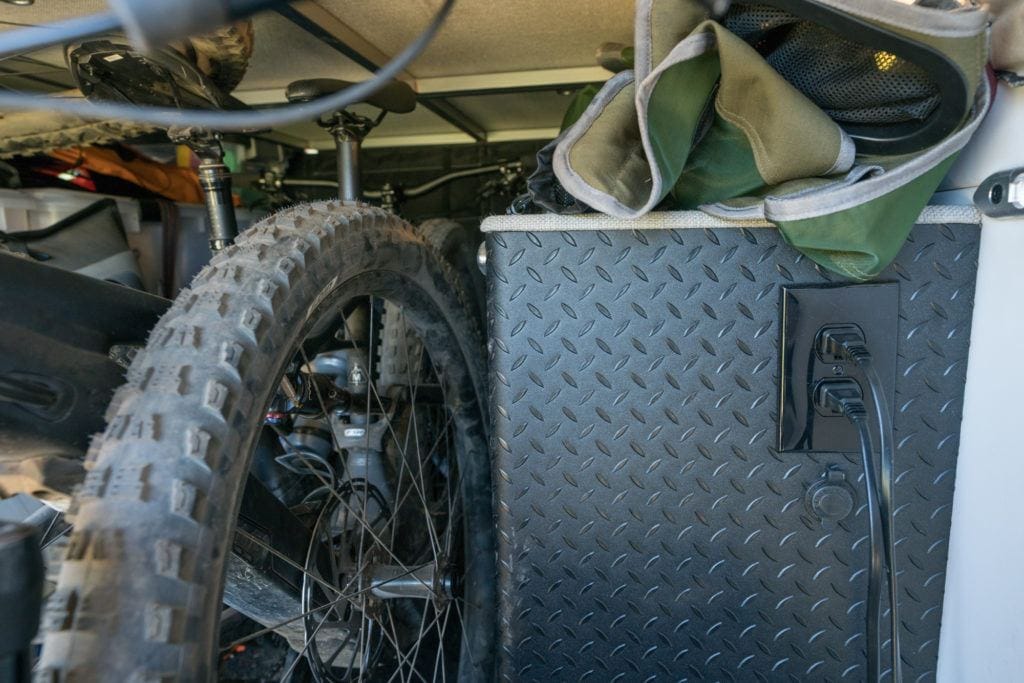
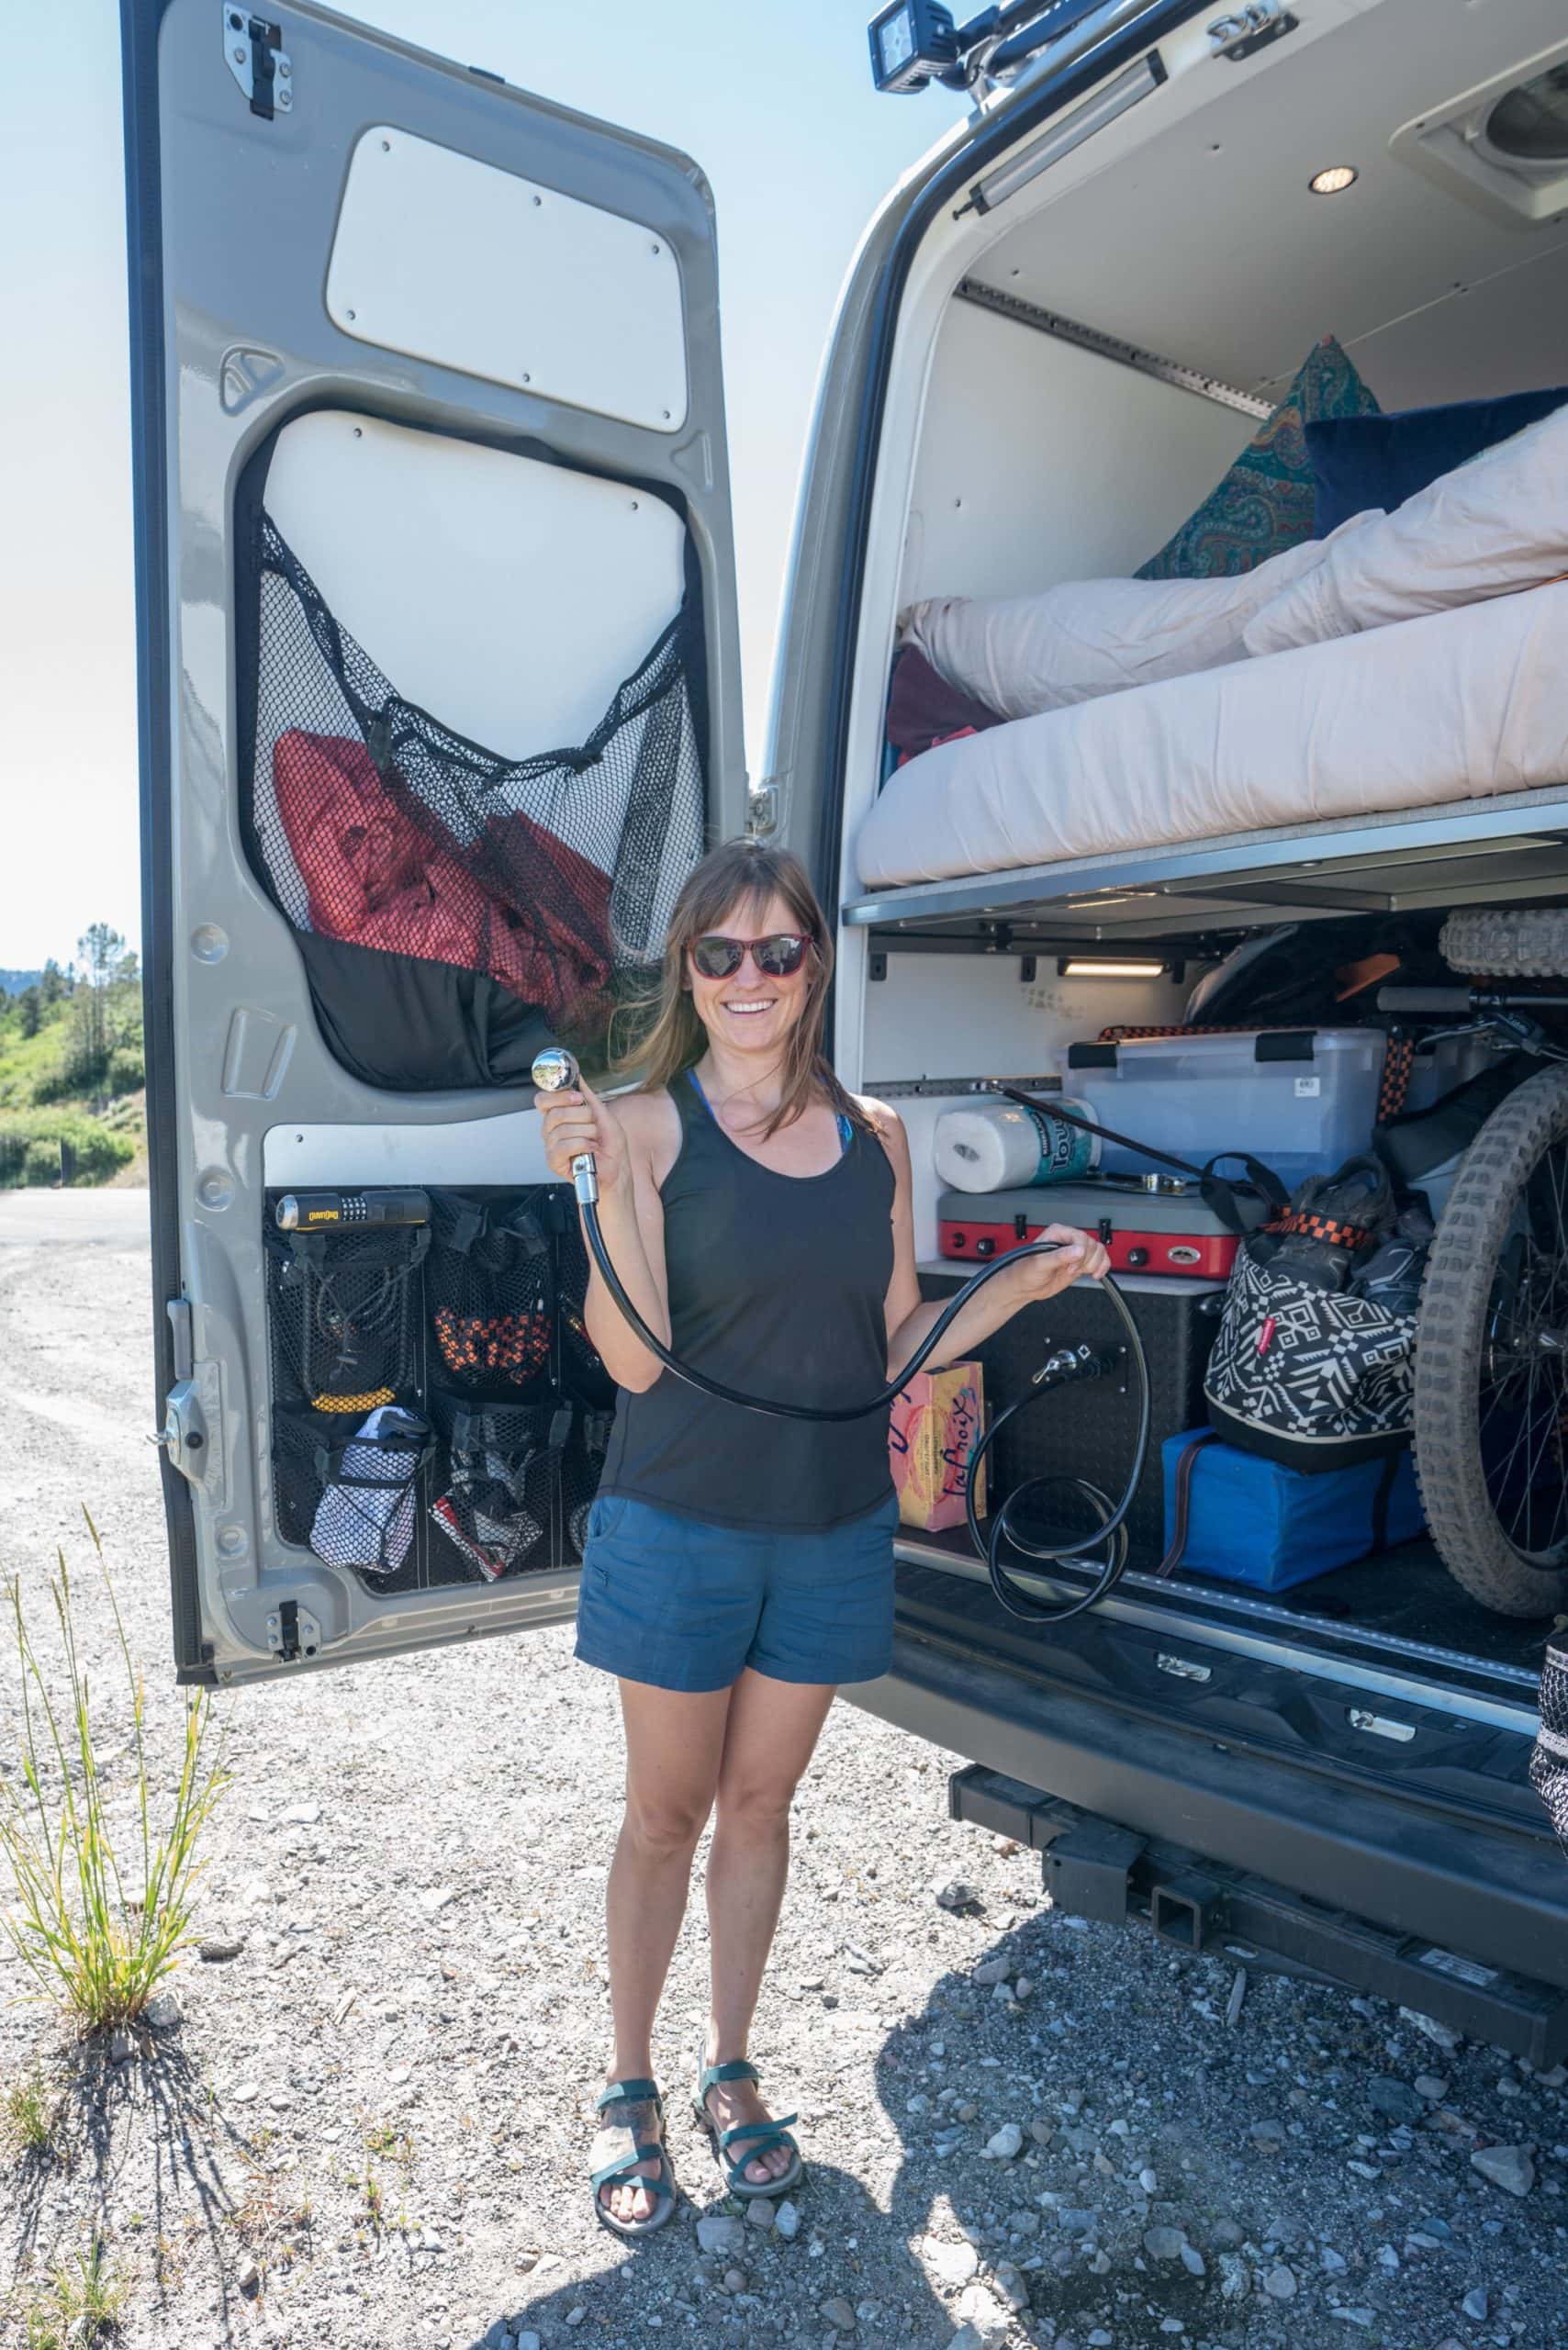
Gear boxes on the back – The molle panel on the back holds extra storage boxes for bulkier gear. To give you an idea of the capacity, right now our two boxes contain: 2 big bags of dog food, 2 camp chairs, a camp table, a large kid carrier backpack, extra diapers, a stroller, tools and hoses, 2 yoga mats, and 3 duffel bags. Rossmonster can even custom-build boxes based on your needs. For example, in winter, we can swap one of our boxes for a custom ski box, making it super easy to carry gear for different seasons.
Dinette storage – Most of the space in the dinette is consumed by the power, water, and heating systems. However, at the foot of the dinette there is a small storage area where we put all of our dog stuff. There is also a small amount of storage under the passenger side bench.
While the storage in the Baja isn’t as obvious as in a camper van, I’ve found that with some smart prioritizing and a little bit of Tetris, we can fit everything we need without feeling like we’re constantly shuffling things around.
Power System
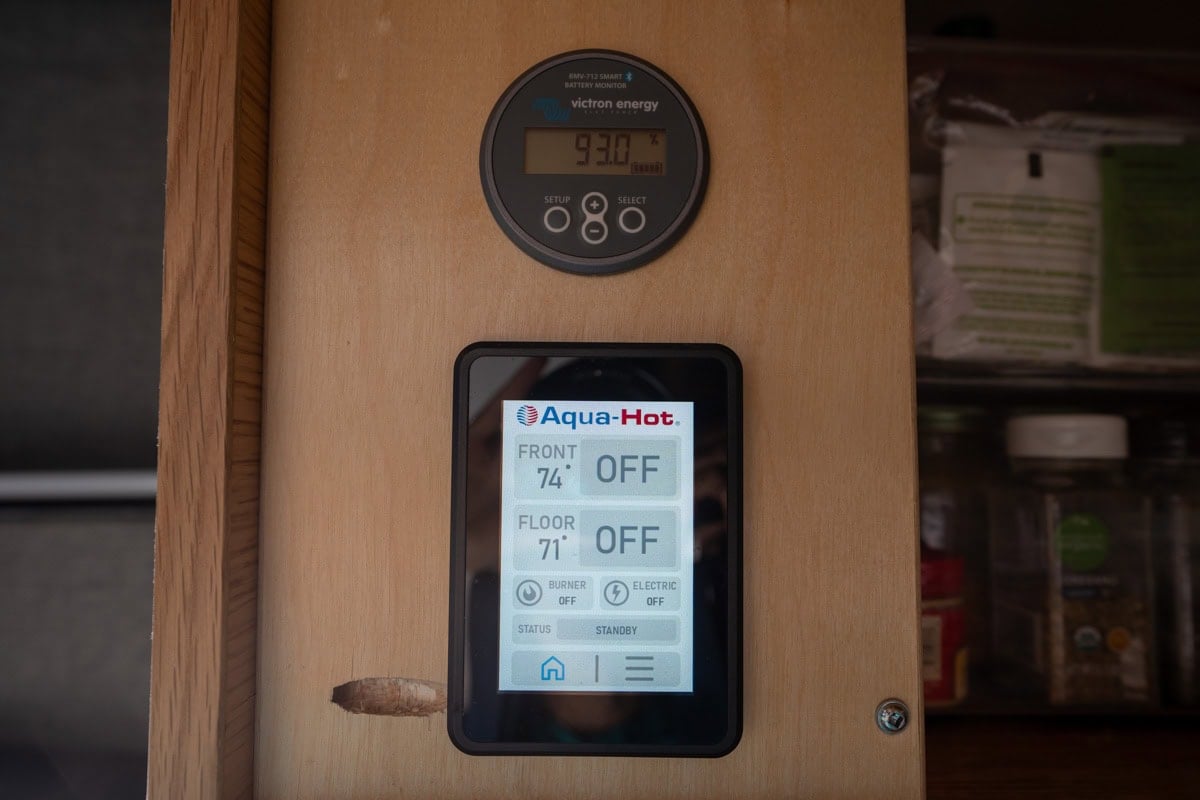
The Rossmonster Baja is powered by a robust Victron Energy system, designed to handle all of our off-grid power needs. The setup includes a 1000Ah LiFePO4 battery bank, a 3000W inverter, 600W of solar, and alternator charging while driving, ensuring we have multiple ways to keep the system topped up.
A 1000Ah battery bank might sound like overkill, but I’m really glad we have such a high-capacity system, especially since we have AC, a microwave, and a Starlink Mini, all of which are big power draws. With this setup, we never have to worry about running out of power, even when using multiple appliances at once.
The 3000W inverter allows us to run multiple high-powered devices simultaneously without tripping the system. For example, we can use the induction stove and air fryer at the same time, which makes cooking much more convenient.
The 600W of solar provides ample recharge on days when we’re not driving, keeping the batteries topped up even when stationary. Since the batteries also charge from the alternator while driving, we rarely have to think about power management.
So far, the system has been performing exactly as expected, giving us more than enough power for daily life on the road.
Hydronic Heat System
The Aquahot hydronic heating system is an efficient and effective way to keep the inside of our camper comfortable in any weather. We have camped in single digits in the snow, and you could have never guessed how cold it was outside.
The Aquahot system runs on diesel fuel from the truck’s main fuel tank, eliminating the need for a separate fuel source.
The Aquahot control panel is very simple to use
The system works by heating a thermal mass of coolant in an exterior burner, which is then circulated inside the camper in three different ways:
Hot Air – The hot air is pushed into the camper underneath the bathroom with close proximity to both sleeping areas. The heater runs on a thermostat, so once it reaches your desired temperature inside, the heater switches to standby.
Instant hot water – Once the system heats up (which takes about 10 minutes), we have endless on-demand hot water in the shower and the sink.
Heated Floors – This makes chilly mornings so much more comfortable by keeping the floor warm.
What’s great is that these three functions can be operated independently, so we only have to run the portions we need at any given time, making the system more efficient and customizable.
Air Conditioning / Cooling
I’ve never had AC in any of my vans, so having an AC unit in here is a welcome addition. We haven’t had the need for AC yet, but in a quick test run, it did a solid job of taking the edge off the heat and making the camper more comfortable.
I’m not sure yet if we’ll be able to run it all night, as I still need to see exactly how much power it consumes over an extended period. What I’m most excited about is having AC for those moments when we need to leave the dogs in the truck for a couple of hours in the summer and being able to cool the camper down while my son naps during the day. Having that extra bit of temperature control will make summer travel so much easier.
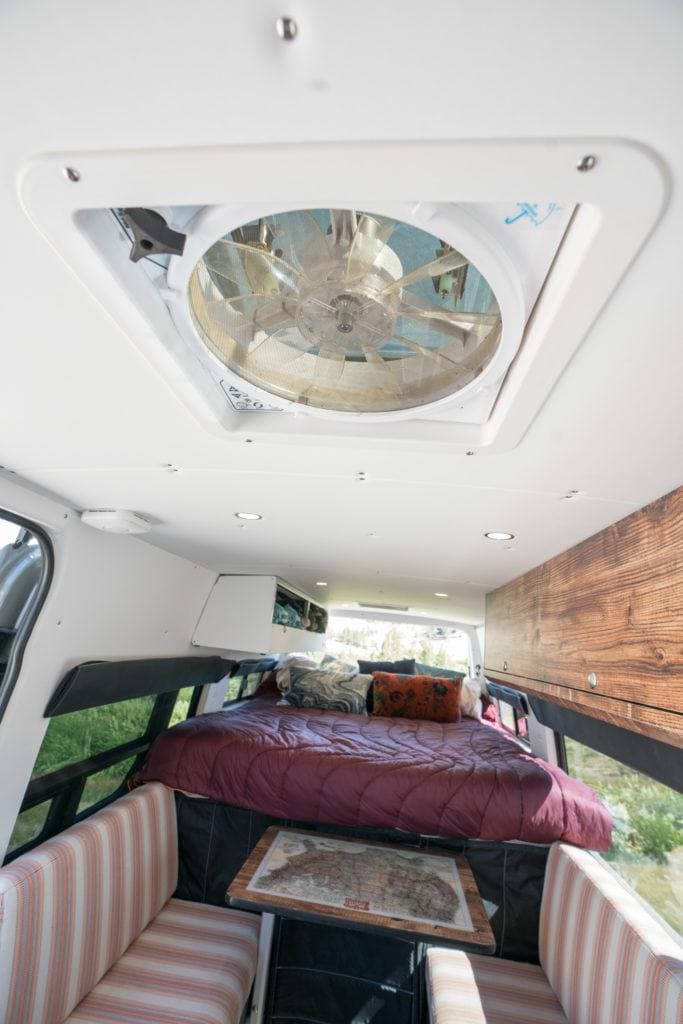
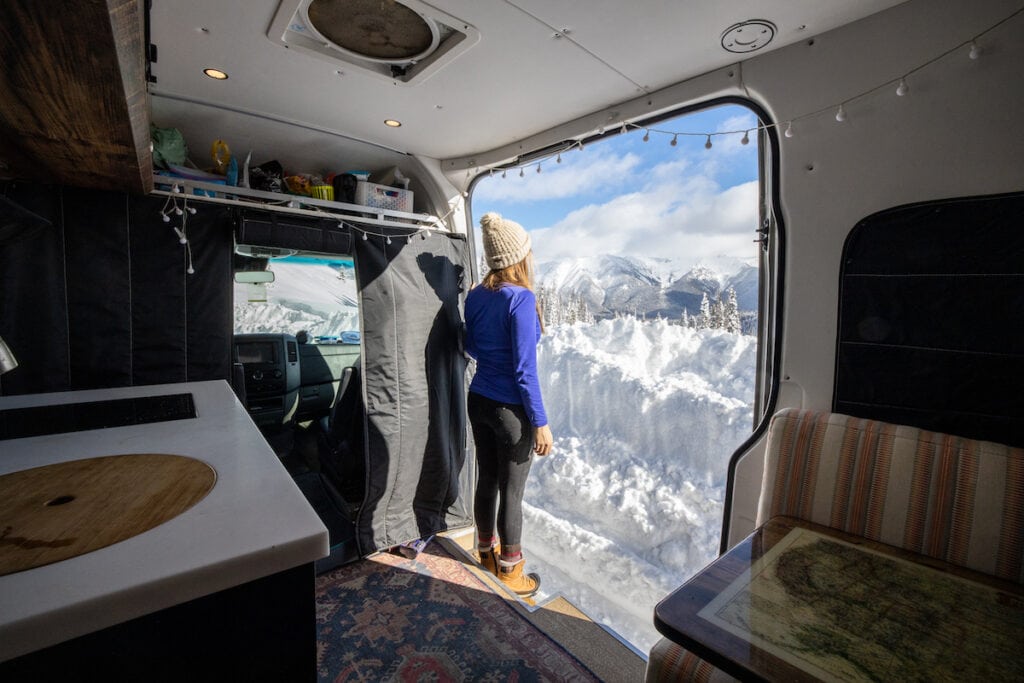
In addition to the AC, the Rossmonster Baja Trail has windows all around, all of which have integrated screens and blackout shades, so we can get a cross breeze without dealing with bugs. There’s also a MaxxAir fan over the dinette and a large skylight with an integrated screen above the bed, both of which add to the ventilation. On warm days when we don’t want to run the AC, simply opening the windows and cranking the fan pulls in fresh air and keeps the camper feeling comfortable.
This skylight above the bed is awesome! At night you can stargaze through it, and the fresh air makes you feel like you are sleeping outside
Exterior Accessories
In addition to the storage boxes on the back, there are a few exterior accessories on the Baja that I find useful for day-to-day life on the road.
Fiama awning – This runs the full length of the camper, providing shade over the patio and windows to help keep the interior cool. It’s great for creating an outdoor living space, especially in hot weather. The only downside is that it’s not built to withstand strong winds, so if it gets breezy, we have to pull it in to prevent damage.
IMax Trax table with MKII boards – This is one of my favorite exterior features and something we use daily. The MKII traction boards are mounted to the side of the camper, making them easily accessible if we ever need them for recovery (we already used them down here in Baja California to help one of our neighbors get unstuck on the beach). When parked, the boards flip down into a convenient table. This is especially useful for keeping everything out of reach of kids and dogs.
On-board air compressor – If you plan to drive on sand or rough terrain, being able to air down your tires is key for better traction. The onboard compressor makes it easy to refill them afterward, so you don’t have to hunt for a gas station or carry a bulky portable pump.
Starlink Mini – Rossmonster includes a roof-mounted Starlink hookup that is wired for use even while driving. It’s incredibly convenient not having to store the dish or set it up every time we stop, making connectivity on the road seamless.
50” OnX6 Baja Designs light bar – We haven’t needed to use this yet since we rarely drive at night, but it’s reassuring to have in case we ever need extra visibility for off-road travel in the dark.
Customer Service
Beyond the quality of the build itself, Rossmonster’s customer service has been outstanding. Like with any custom-built camper, a few small things have come up—one of the reading lights in our bed stopped working, for example. I let Rossmonster know, and by the end of the day, they had a new light in the mail, along with detailed instructions on how to swap it out. Their team is small, but it’s clear they take a ton of pride in their work and genuinely care about customer satisfaction.
Having a company that stands behind its product and is responsive when things need attention gives me a lot of confidence in this rig for long-term travel.
Final Thoughts
After the last few months of full-time travel in the Rossmonster Trail Baja Trail, I can confidently say it’s been the perfect rig for our family. It strikes the ideal balance between comfort and capability, giving us the space we need without limiting where we can go.
If you’re looking for a highly functional, rock-solid, adventure-ready truck camper, the Baja Trail is a fantastic choice.
Got questions about my Rossmonster Baja review? Leave them down in the comments below!
I started van life in 2016 and since then, I’ve owned three different Sprinter Vans. My second Sprinter Van was converted by Portland-based Outside Van, a well-known industry expert, and out of all my vans, this one – designed for 2 adults -had my favorite floorplan.
Built on a 170″ chassis, this 4×4 Sprinter easily handled everything I threw at it – whether that be rough 14,000-foot mountain passes in Colorado, icy roads while chasing powder, or driving across the country for the fall colors.
The van was designed a couple (and our two dogs) with a platform bed, small dinette, and a galley with lots of storage for our bigger outdoor gear including e-bikes, backpacking gear, packrafts, and more.
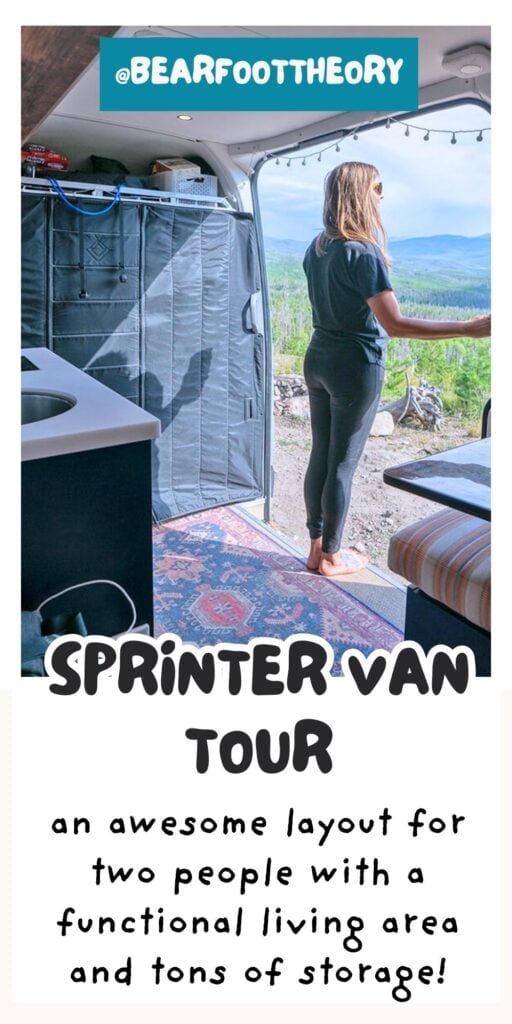
In this post, I’m giving you a full tour of my Sprinter van conversion, and I’ll share what I loved most about the layout and what I’d tweak.
My Priorities for this Sprinter Van
With this van conversion, I wanted to make some major changes to my floorplan from my first Sprinter Van (a 144” wheelbase). That van had a full indoor bathroom, an open aisle layout, and a convertible dinette/sofa bed. Overall it was great for solo travel and shorter trips, but I couldn’t carry a lot of big gear. Plus, I was now joined by my partner and our pups. My evolving situation meant my needs in a van changed.
For my second Sprinter Van, I wanted:
More storage for multiple bikes, outdoor gear, and seasonal adventure equipment
A dedicated workspace that didn’t require constant setup and teardown
A lighter, better-balanced build that could handle rough dirt roads without falling apart
A robust power system that could support 4-seasons of off-grid living
I wanted the van to have a modern, cozy vibe, but I was unwilling to sacrifice function for looks. I wanted to be able to go anywhere in this van, so it needed to be built with durable materials that could stand up to the bumps in the road.
The floorplan I decided on was a galley across from the slider door, a small dinette for working and eating, and a big platform bed with a huge gear garage underneath.
I’m going to get into all of the details about this Sprinter camper van below, but if you prefer to watch, I filmed a full video tour for my YouTube channel.
What I loved about this Sprinter Camper Van
This Sprinter Van floorplan was extremely functional for two adults. It had *almost* everything we needed to live full-time on the road. Here are a few of the features I really loved about this Sprinter conversion:
So much open space: I loved that there was room for us to maneuver around without having to squeeze by one another.
Dinette: The dinette made it very convenient to work. Since I work full-time when I’m doing van life, this was important to me. I also liked having this seating area for hanging out and not having to rely on the two front swivel seats for relaxing
Gear Garage: Having the big gear garage was a non-negotiable for me, and we used every inch of it.
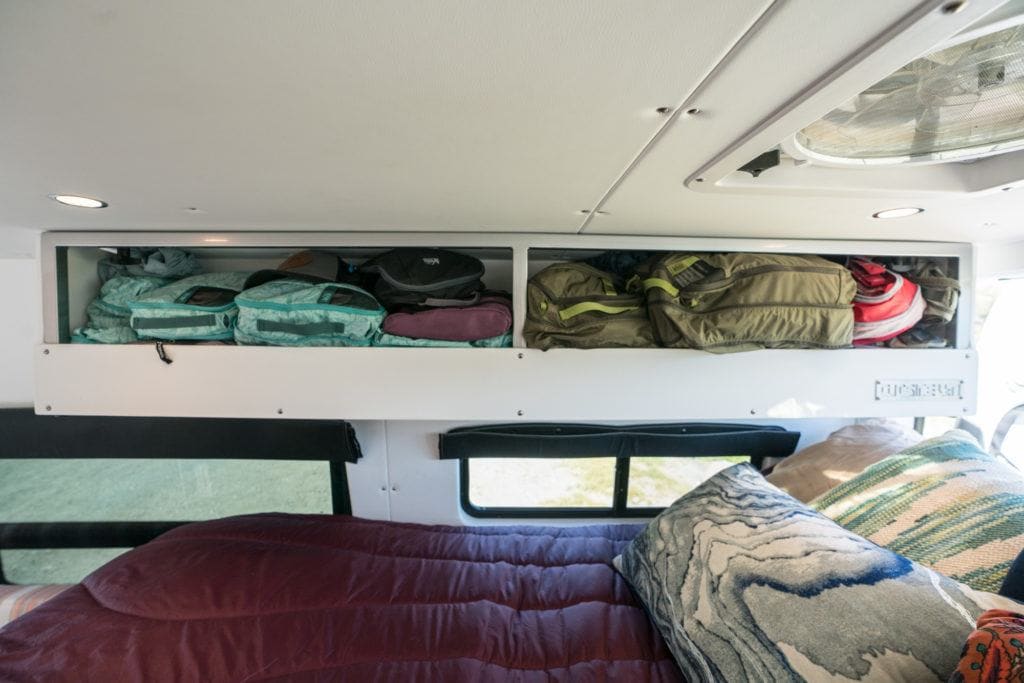
Storage for daily essentials: This van had tons of storage. I had overhead cabinets, big drawers for storage in the dinette, and a big shelf over the cab.
Platform Bed: After having to convert the bed in my first Sprinter Van, having the bed always ready to hop into was a welcome change.
Soft wall between the living area and the cab: There was an insulated black out curtain separating the front and back of the van that us offered instant privacy
What I wanted to change about this Sprinter Camper Van
I really nailed the layout in this Sprinter, so there wasn’t a whole lot I didn’t like. The things I did want to change came down to a few minor design details.
Dinette upholstery: Since we had to step on the couch to get up into the bed, the couch upholstery was impossible to keep clean. The lighter colors really showed this dirt. I wish I would have chose a material I could have wiped clean.
Floor choice: The floor material I chose was a vinyl weave. The texture made it impossible to clean, so I had to cover it with a rug
Clothing cabinet: I didn’t like that there wasn’t a door or cover on the clothing cabinets. Since we were always stuffing clothes in there, it always looked pretty messy.
There was also no bathroom, but that was by design. We didn’t need one at the time, and instead we used a Go Anywhere foldable toilet that stored easily in the garage and could be pulled out only when we needed it.
Now I’ll get into the details of the build and the components.
Galley
The galley had a large sink, a one-burner induction stove, a 4.6 cu ft fridge, and drawers for all of our essential van cooking equipment. While we didn’t have a ton of counter space, we could use the table in the dinette when the counters got too crowded.
Cabinets and Drawers
The overhead cabinets and the galley drawers fit our pots, pans, utensils, food, and toiletries. Here are some of the specs:
Marine-grade plywood cabinetry: This is the ideal material for a van conversion because it doesn’t expand in the heat or distort over time. Marine grade plywood is also the standard used in boats and is made to withstand a bumpy ride.
Bamboo dovetail drawers with push locks: All of the drawers had a slow closing mechanism to prevent them from slamming shut and push locks to keep the drawers and cabinets from opening while I was driving.
Avonite countertop: Avonite is an acrylic material, which is lighter than granite and quartz and more durable than corion. The counters held up really well, other than one minor chip on one of the edges and a few small scratches. While I love white counters, vans are dirty, and the white shows EVERYTHING.
The one-burner induction stove was great for morning coffee, simple meals, stealth camping, and bad weather days. However, induction stoves require a lot of power, so we still did most of our cooking outside on a two-burner portable camp stove.
Induction stove vs Gas Stove for Sprinter Camper Vans
While an induction stove does require a powerful battery bank and an inverter, they have a lot of benefits. Here’s why I chose one over a gas stove:
Induction stoves heat up and cool down extremely fast, so you aren’t likely to burn yourself
They are easy to clean
They are safer since your aren’t combusting gas inside the van.
Isotherm 4.6 cu ft Fridge
Isotherm is one of the main fridge brands you’ll see in camper van conversions. Designed for boats, these are made to survive shaking, vibration, and rigid movements. This 4.6 cubic foot model is large enough to have ~5 days of fresh food for 2 people, although you really have to cram everything in there.
I’ve had Isotherm fridges in all of my vans, and I’ve had the same complaints each time around. After about 4 weeks, the small freezer starts to ice up and you have to pull everything out of the fridge to defrost it. It’s such a pain when you don’t have anywhere to put that food to keep it cold during this process. I’ve also had the freezer door break, the door shelf covers break, and the shelves collapse and break.
I’m not sure why this fridge is the industry standard, and someone definitely needs to come out with something better. Side note: If you’re open to a chest style fridge, I love the Luna National brand. They are built tough for overlanding and are very efficient as far as power consumption.
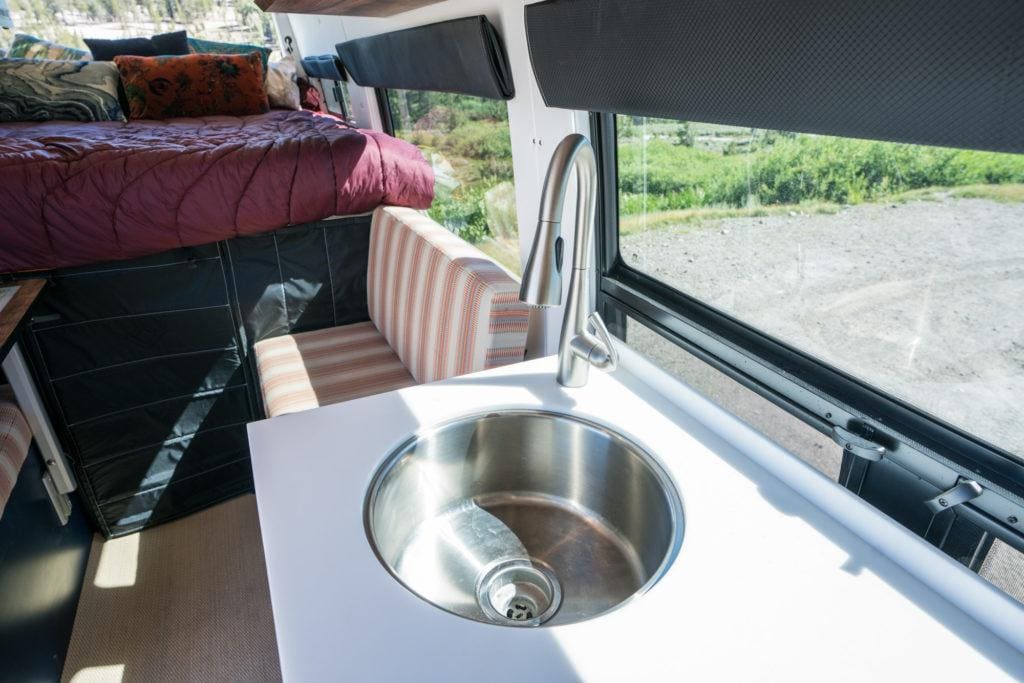
Large Stainless Steel Sink
I think having a large sink is essential in a van. The dirty dishes add up so quick when you are cooking in a small space, so having somewhere for them to go helps keep the mess at bay.
The pull-down faucet made it easy to conserve water while doing dishes. However, because this type of faucet can rotate, we had issues with it twisting around while driving on bumpy roads.
Dinette & Workspace
Running this blog is my full-time job, so I wanted a dedicated work area that was ready for me to sit down and crank out work at all times. I really liked being able to sit across from someone, and it worked out fabulous for working, eating, and hanging out.
Under the bench seats were two large drawers. We stored our dog food and supplies in one drawer and my work stuff in the other. It was really convenient having my computer so close to my work space.
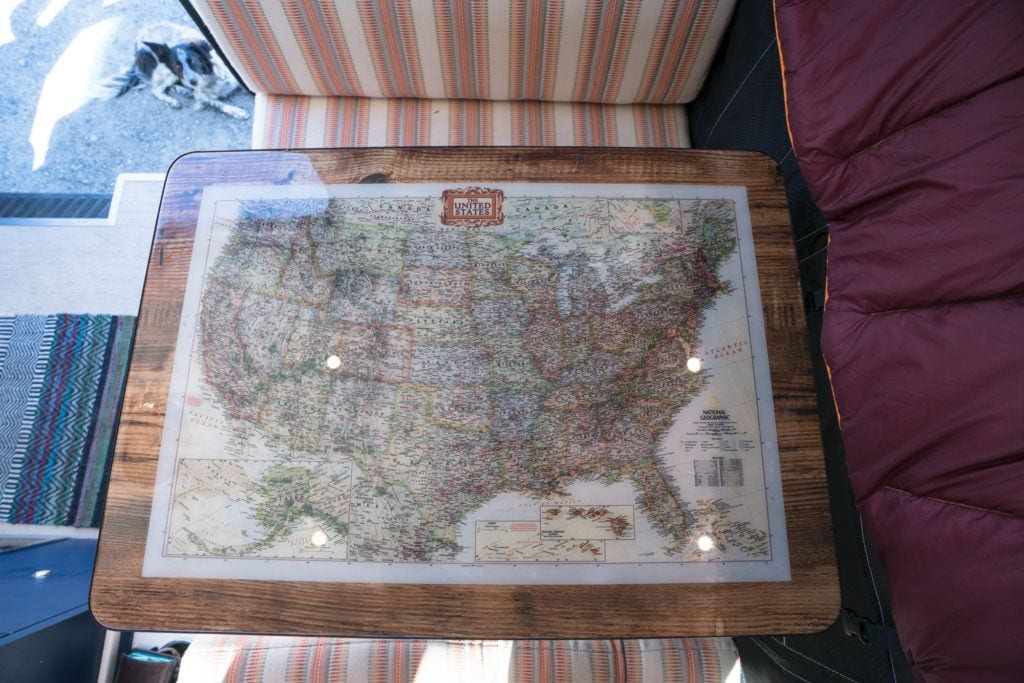
Lagun Swivel Table
The table in the middle of the dinette is on a Lagun swivel mount and serves as a desk and dining table. The Lagun mount allows you to move the table around or to push it all the way to one side when you want it out of the way. We usually kept the table in place while driving, but you could also remove it if you wanted to turn the dinette into a lounge (more on that below).
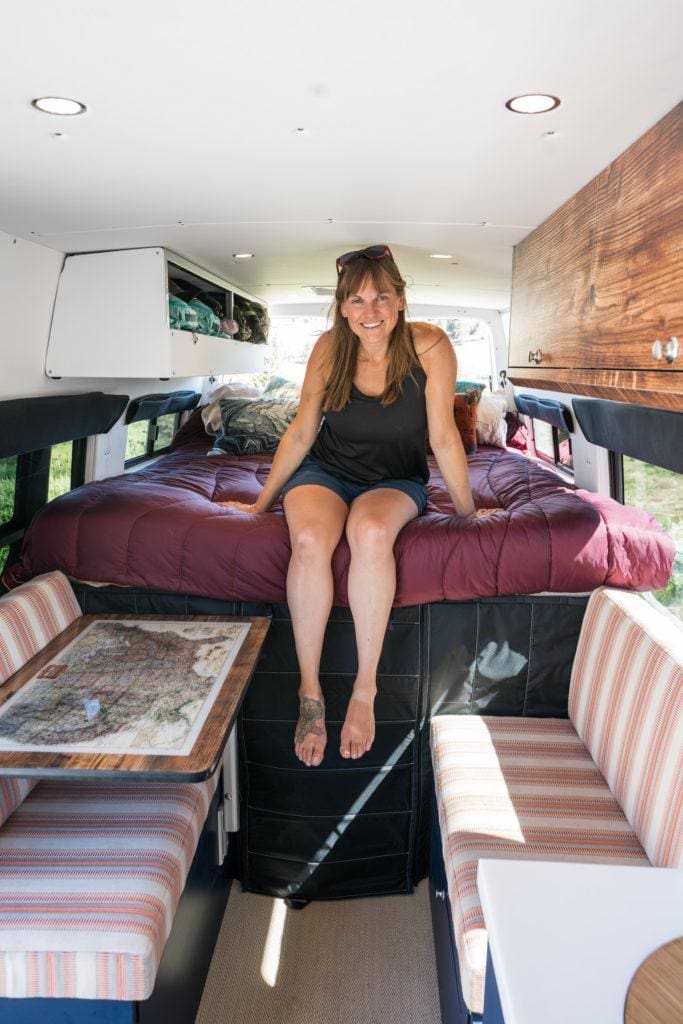
In my case, the swivel mount made it easier to access the gear garage from in inside the van. I also had the idea to have a US map placed on the tabletop to add some character to the van.
Convertible Lounge
The dinette converted into a small bed or lounge, although I’ll admit we never once used this. In theory, it sounded great, but we didn’t really need for an extra bed, especially since we didn’t have a seatbelt for a third passenger.
Platform Bed
I wanted a bed that didn’t have to be set up every single day, so I opted for a queen sized three-panel aluminum platform bed.
The bed had a capacity of 500 pounds and all three panels secured to the bed rails via a spring-loaded threaded fastener. While the bed was removable, I never once took the panels out.
The mattress the van came with was only 4″ thick, so I added a 2″ organic latax topper that made it comfier than any bed I’ve ever owned. I just had to cut the topper so it was the right size.
The only thing I didn’t like about the bed is that I didn’t have a whole lot of head room, especially with the topper in place. Having a lower bed with more headroom would have meant that we couldn’t fit our bikes underneath, so like everything in a van conversion, this was a trade off.
My comforter, for those who are curious, is made by Rumpl.
Clothing Storage
All of the clothing we packed for van life was stored in packing cubes in an open cabinet on the side of the bed. There was room to sleep underneath it, but not really without accidently hitting your head in the middle of the night. So instead, the dogs slept under it pushed against the wall.
The open style had its pros and cons. The lack of cabinet face meant it was quick and easy to pull a packing cube or or stuff something up here. However, it hated that this area always looked so sloppy.
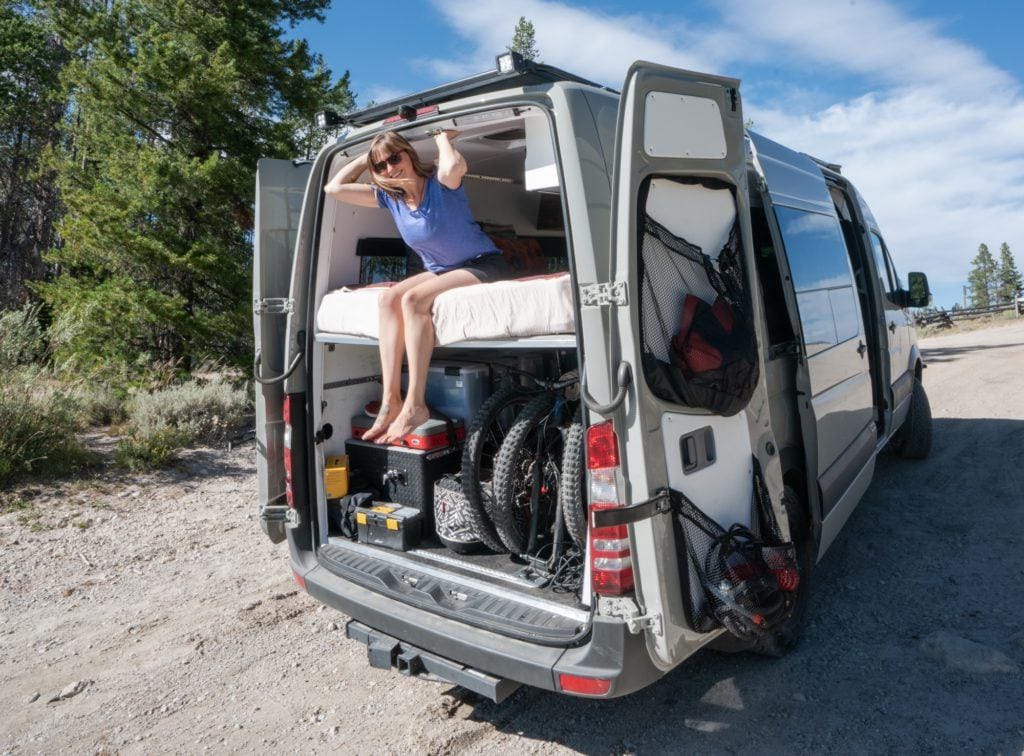
The Gear Garage
Underneath the bed there was a ton of storage for all of our big gear. So much that if we didn’t have our bikes, we had a tough time filling it! We could fit two Specialized e-mountain bikes, all of our camping, and outdoor gear, shoes, and even a couple of small inflatable packrafts.
In addition, the garage had 25 gallon water tank and a Webasto Dual Top Evo 6 for heat and hot water on the left side and all of the electronics and batteries on the right side.
Bike Storage
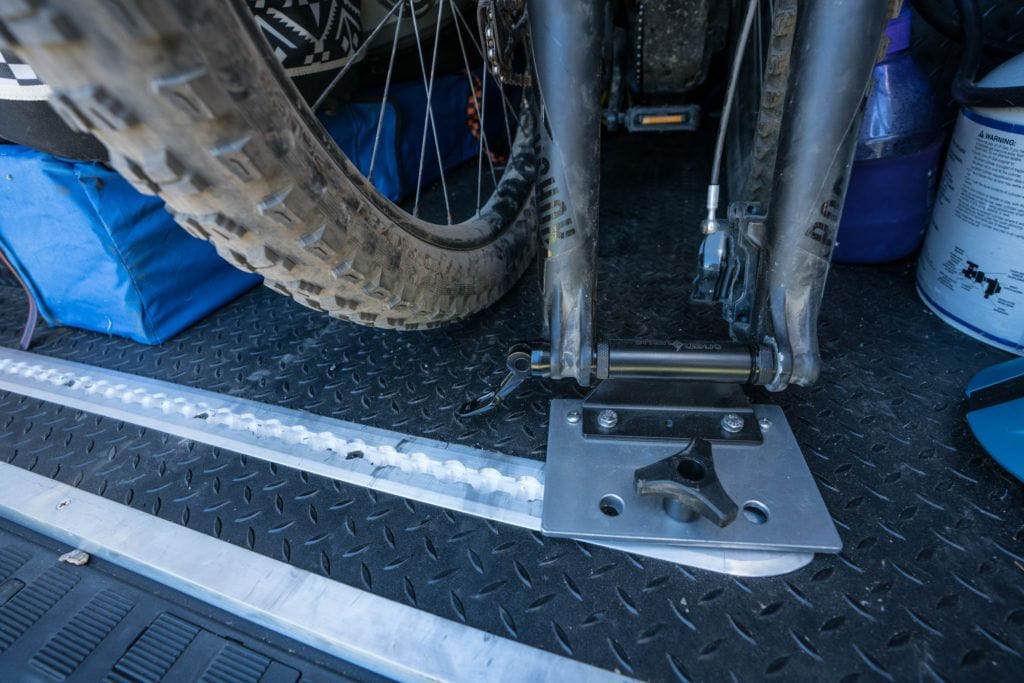
In order to get the bikes under the bed, we took the front wheels off and faced each bike in opposite directions to get them as tight as possible. Then we used a fork mount to mount the bikes to the floor’s L-track so they didn’t shift around while we were driving.
I was very happy being able to store the e-bikes inside the van, but it was a bit of a hassle to get them in and out since all of the other gear next to the bikes also had to be pulled out to get the bikes inside.
It would be cool to have the bikes on some sort of slider system, but you end up losing a few inches vertically, and I didn’t want our bed any higher.
Our bikes are secured by a front-axle thru-mount
Garage organization
You may be wondering how easy it was to stay organized with one huge open garage vs having drawers and compartments. A big drawer system, especially if it’s made of wood, adds weight to your build and is another component of the van that you have to worry about breaking if you like to drive off-road.
Having a big open space was great because we could store our gear in plastic bins and duffel bags. This gave us a lot of flexibility to swap out gear each season.
There was L-track along the floors and side walls that we used to quickly strap bins down.
I opted to keep my garage area simple and easy to access
Power System
Running low on power can be stressful—not to mention harmful to your batteries if they drop too low—so I wanted a setup that would keep everything running smoothly. We lived in this Sprinter van for 8 months a year, so I needed a system that could handle electric bikes, my computer, camera, induction stove, heater, and other electronics without any worries, especially in winter.
Batteries
This van was built before lithium batteries became the industry standard. Instead it had a 660 amp/hour AGM battery bank, which at the time was considered to be VERY powerful.
Note: Since then, AGM batteries have mostly been phased out of new van conversions for lithium, and in general people have really beefed up their batteries banks. For example, in my current rig, we have 1000 amp hours of lithium batteries.
In the 4 years that I lived mostly full-time in this van, we never had to plug in out of necessity, and the system was powerful enough for our needs. The only time we found ourselves conserving was in the winter when we were cooking on the induction stove a lot and the solar panels weren’t as effective.
The batteries got charged in 2 ways. First we had a hearty panel system on the roof.
The batteries were also hooked up to the van’s alternator which I highly recommend. It’s helpful to be able to charge the batteries while you’re driving especially when your batteries are low and the sun isn’t out.
Solar panels
There were 445 watts of Zamp Solar panels on the roof. Zamp (now owned by Dometic) makes all of their panels right here in the US.
Almost the entire roof was covered except a small walkway in the center of the roof rack. There were four 80-watt panels and one 125 watt panel.
To give you a rough idea of how much power solar can produce – on a fully sunny day, one of my single 80-watt solar panels could create enough power to run the fridge.
Inverter
The final piece of any van’s electrical system is an inveter, which converts battery power into usable AC power for my appliances and outlets. Inverters are rated by wattage, and the larger the wattage, the more applicances they can handle at once. I had a 2000-watt pure-sine inverter which is pretty standard and can handle an induction stove or a blender and charging small devices at the same time.
Temperature Control
Battery banks at the time weren’t powerful enough to reliably run an air conditioning without having to be plugged in. Good news…that’s changed so if you want an AC (my new rig has one), it is possible. If you don’t have or want AC, here are some tips for staying cool in your van in the summer.
Ceiling fans
I had two Maxx Air Fans. One above the galley and one above the bed. They each have a rain sensor and create really nice airflow in the van. Compared to my Fantastic Fan in my first Sprinter Van, I prefer the Maxx Fans.
Windows
We had windows running the length of the van. The front and rear ones had vents that you could open. With the fans running, we could get pretty good airflow in the van, especially at night.
Insulating window shades
All of the window coverings were insulated. This helped keep things cooler in the summer and prevented warm air from escaping through the windows in the winter.
Privacy & insulation curtain
The curtain that led to the front of the van was also insulated with zippered walkway in the middle. This was one of my favorite things in the van because it was incredibly easy to zip closed when we wanted privacy or to insulate the living area from the cab.
Heating for winter adventures
For heat in the winter, we had a Webasto Dual Top Diesel Heater. The Webasto produces hot air and hot water and runs off the diesel in your existing diesel tank.
We had our van down to single digits at night many times on ski trips, and the van always felt toasty warm inside.
The biggest issue with Webasto is that it’s really hard to find places to service them if something goes wrong. While the Webasto functioned well, I would recommend looking at a different diesel heater brand.
Water Systems
I wanted my entire plumbing system contained inside the van, so I didn’t have to worry about anything freezing in the winter. It was a simple streamlined setup and very easy to fill up our water.
Water tanks
I had a 25-gallon water tank inside a cabinet in the garage, alongside the Webasto Dual Top heater which stores an additional 3 gallons of hot water in the boiler. The BPA-free water tank was permanent, but it could easily be filled using a hose or 5-gallon jugs if I couldn’t find a spigot with potable water.
Water that runs through lines to the sink goes through a three-stage charcoal water filter that ensures the water we were drinking was clean.
Shower
I skipped the indoor shower in this van. With 25 gallons of water, you can’t really do much showering or you’d be filling up your tanks constantly. Instead, we had an outdoor shower where we could quickly hook up a shower hose to the back of the water tank. To be honest, we never really used the outdoor shower except for a hand full of times. Showering outside can only be done a few months a year or its too cold, and you also have to be somewhere private enough to use it. There is also the issue of the greywater runoff which means you can’t use it in a paid campground.
Since there was no dedicated bathroom in this van, I wanted the smallest, easiest toilet to deal with. For pee, we peed in pee jars and for poop, we used this foldable Go Anywhere toilet that utilizes wag bags. Once you’re done going, the bag just goes in the trash can. The bags do get pricey, so if there was a clean public toilet available, we would go in that instead.
I had two different types of flooring in this van. A vinyl weave in the font and a durable diamond plate vinyl in the gear garage.
The vinyl weave in the front looked nice, but it was IMPOSSIBLE to clean. Every little piece of dirt and grime got stuck in the weave, and I ended up covering up a good chunk of the floor with a rug. This floor material was my least favorite part of the whole van.
In the garage, the diamond plate vinyl was scratch resistant, which was perfect for sliding around our bins and bikes. It was not the most elegant looking, but it was very functional for its purpose.
The walls in this van were made of a synthetic, non-toxic leather material called Sileather, which I absolutely loved. It was eco-friendly and waterproof so you could wipe it down with a wet cloth. It was also perfect for dog owners since dog hair and dust didn’t stick to it.
I would highly recommend Sileather if you are planning out a van build.
What questions do you have about this Sprinter van conversion? Leave a comment below and let me know!
I started van life in 2016 and since then, I’ve owned three different Sprinter Vans. My second Sprinter Van was converted by Portland-based Outside Van, a well-known industry expert, and out of all my vans, this one – designed for 2 adults -had my favorite floorplan.
Built on a 170″ chassis, this 4×4 Sprinter easily handled everything I threw at it – whether that be rough 14,000-foot mountain passes in Colorado, icy roads while chasing powder, or driving across the country for the fall colors.
The van was designed a couple (and our two dogs) with a platform bed, small dinette, and a galley with lots of storage for our bigger outdoor gear including e-bikes, backpacking gear, packrafts, and more.
In this post, I’m giving you a full tour of my Sprinter van conversion, and I’ll share what I loved most about the layout and what I’d tweak.
My Priorities for this Sprinter Van
With this van conversion, I wanted to make some major changes to my floorplan from my first Sprinter Van (a 144” wheelbase). That van had a full indoor bathroom, an open aisle layout, and a convertible dinette/sofa bed. Overall it was great for solo travel and shorter trips, but I couldn’t carry a lot of big gear. Plus, I was now joined by my partner and our pups. My evolving situation meant my needs in a van changed.
For my second Sprinter Van, I wanted:
More storage for multiple bikes, outdoor gear, and seasonal adventure equipment
A dedicated workspace that didn’t require constant setup and teardown
A lighter, better-balanced build that could handle rough dirt roads without falling apart
A robust power system that could support 4-seasons of off-grid living
I wanted the van to have a modern, cozy vibe, but I was unwilling to sacrifice function for looks. I wanted to be able to go anywhere in this van, so it needed to be built with durable materials that could stand up to the bumps in the road.
The floorplan I decided on was a galley across from the slider door, a small dinette for working and eating, and a big platform bed with a huge gear garage underneath.
I’m going to get into all of the details about this Sprinter camper van below, but if you prefer to watch, I filmed a full video tour for my YouTube channel.
What I loved about this Sprinter Camper Van
This Sprinter Van floorplan was extremely functional for two adults. It had *almost* everything we needed to live full-time on the road. Here are a few of the features I really loved about this Sprinter conversion:
So much open space: I loved that there was room for us to maneuver around without having to squeeze by one another.
Dinette: The dinette made it very convenient to work. Since I work full-time when I’m doing van life, this was important to me. I also liked having this seating area for hanging out and not having to rely on the two front swivel seats for relaxing
Gear Garage: Having the big gear garage was a non-negotiable for me, and we used every inch of it.
Storage for daily essentials: This van had tons of storage. I had overhead cabinets, big drawers for storage in the dinette, and a big shelf over the cab.
Platform Bed: After having to convert the bed in my first Sprinter Van, having the bed always ready to hop into was a welcome change.
Soft wall between the living area and the cab: There was an insulated black out curtain separating the front and back of the van that us offered instant privacy
What I wanted to change about this Sprinter Camper Van
I really nailed the layout in this Sprinter, so there wasn’t a whole lot I didn’t like. The things I did want to change came down to a few minor design details.
Dinette upholstery: Since we had to step on the couch to get up into the bed, the couch upholstery was impossible to keep clean. The lighter colors really showed this dirt. I wish I would have chose a material I could have wiped clean.
Floor choice: The floor material I chose was a vinyl weave. The texture made it impossible to clean, so I had to cover it with a rug
Clothing cabinet: I didn’t like that there wasn’t a door or cover on the clothing cabinets. Since we were always stuffing clothes in there, it always looked pretty messy.
There was also no bathroom, but that was by design. We didn’t need one at the time, and instead we used a Go Anywhere foldable toilet that stored easily in the garage and could be pulled out only when we needed it.
Now I’ll get into the details of the build and the components.
Galley
The galley had a large sink, a one-burner induction stove, a 4.6 cu ft fridge, and drawers for all of our essential van cooking equipment. While we didn’t have a ton of counter space, we could use the table in the dinette when the counters got too crowded.
Cabinets and Drawers
The overhead cabinets and the galley drawers fit our pots, pans, utensils, food, and toiletries. Here are some of the specs:
Marine-grade plywood cabinetry: This is the ideal material for a van conversion because it doesn’t expand in the heat or distort over time. Marine grade plywood is also the standard used in boats and is made to withstand a bumpy ride.
Bamboo dovetail drawers with push locks: All of the drawers had a slow closing mechanism to prevent them from slamming shut and push locks to keep the drawers and cabinets from opening while I was driving.
Avonite countertop: Avonite is an acrylic material, which is lighter than granite and quartz and more durable than corion. The counters held up really well, other than one minor chip on one of the edges and a few small scratches. While I love white counters, vans are dirty, and the white shows EVERYTHING.
The one-burner induction stove was great for morning coffee, simple meals, stealth camping, and bad weather days. However, induction stoves require a lot of power, so we still did most of our cooking outside on a two-burner portable camp stove.
Induction stove vs Gas Stove for Sprinter Camper Vans
While an induction stove does require a powerful battery bank and an inverter, they have a lot of benefits. Here’s why I chose one over a gas stove:
Induction stoves heat up and cool down extremely fast, so you aren’t likely to burn yourself
They are easy to clean
They are safer since your aren’t combusting gas inside the van.
Isotherm 4.6 cu ft Fridge
Isotherm is one of the main fridge brands you’ll see in camper van conversions. Designed for boats, these are made to survive shaking, vibration, and rigid movements. This 4.6 cubic foot model is large enough to have ~5 days of fresh food for 2 people, although you really have to cram everything in there.
I’ve had Isotherm fridges in all of my vans, and I’ve had the same complaints each time around. After about 4 weeks, the small freezer starts to ice up and you have to pull everything out of the fridge to defrost it. It’s such a pain when you don’t have anywhere to put that food to keep it cold during this process. I’ve also had the freezer door break, the door shelf covers break, and the shelves collapse and break.
I’m not sure why this fridge is the industry standard, and someone definitely needs to come out with something better. Side note: If you’re open to a chest style fridge, I love the Luna National brand. They are built tough for overlanding and are very efficient as far as power consumption.
Large Stainless Steel Sink
I think having a large sink is essential in a van. The dirty dishes add up so quick when you are cooking in a small space, so having somewhere for them to go helps keep the mess at bay.
The pull-down faucet made it easy to conserve water while doing dishes. However, because this type of faucet can rotate, we had issues with it twisting around while driving on bumpy roads.
Dinette & Workspace
Running this blog is my full-time job, so I wanted a dedicated work area that was ready for me to sit down and crank out work at all times. I really liked being able to sit across from someone, and it worked out fabulous for working, eating, and hanging out.
Under the bench seats were two large drawers. We stored our dog food and supplies in one drawer and my work stuff in the other. It was really convenient having my computer so close to my work space.
Lagun Swivel Table
The table in the middle of the dinette is on a Lagun swivel mount and serves as a desk and dining table. The Lagun mount allows you to move the table around or to push it all the way to one side when you want it out of the way. We usually kept the table in place while driving, but you could also remove it if you wanted to turn the dinette into a lounge (more on that below).
In my case, the swivel mount made it easier to access the gear garage from in inside the van. I also had the idea to have a US map placed on the tabletop to add some character to the van.
Convertible Lounge
The dinette converted into a small bed or lounge, although I’ll admit we never once used this. In theory, it sounded great, but we didn’t really need for an extra bed, especially since we didn’t have a seatbelt for a third passenger.
Platform Bed
I wanted a bed that didn’t have to be set up every single day, so I opted for a queen sized three-panel aluminum platform bed.
The bed had a capacity of 500 pounds and all three panels secured to the bed rails via a spring-loaded threaded fastener. While the bed was removable, I never once took the panels out.
The mattress the van came with was only 4″ thick, so I added a 2″ organic latax topper that made it comfier than any bed I’ve ever owned. I just had to cut the topper so it was the right size.
The only thing I didn’t like about the bed is that I didn’t have a whole lot of head room, especially with the topper in place. Having a lower bed with more headroom would have meant that we couldn’t fit our bikes underneath, so like everything in a van conversion, this was a trade off.
My comforter, for those who are curious, is made by Rumpl.
Clothing Storage
All of the clothing we packed for van life was stored in packing cubes in an open cabinet on the side of the bed. There was room to sleep underneath it, but not really without accidently hitting your head in the middle of the night. So instead, the dogs slept under it pushed against the wall.
The open style had its pros and cons. The lack of cabinet face meant it was quick and easy to pull a packing cube or or stuff something up here. However, it hated that this area always looked so sloppy.
The Gear Garage
Underneath the bed there was a ton of storage for all of our big gear. So much that if we didn’t have our bikes, we had a tough time filling it! We could fit two Specialized e-mountain bikes, all of our camping, and outdoor gear, shoes, and even a couple of small inflatable packrafts.
In addition, the garage had 25 gallon water tank and a Webasto Dual Top Evo 6 for heat and hot water on the left side and all of the electronics and batteries on the right side.
Bike Storage
In order to get the bikes under the bed, we took the front wheels off and faced each bike in opposite directions to get them as tight as possible. Then we used a fork mount to mount the bikes to the floor’s L-track so they didn’t shift around while we were driving.
I was very happy being able to store the e-bikes inside the van, but it was a bit of a hassle to get them in and out since all of the other gear next to the bikes also had to be pulled out to get the bikes inside.
It would be cool to have the bikes on some sort of slider system, but you end up losing a few inches vertically, and I didn’t want our bed any higher.
Our bikes are secured by a front-axle thru-mount
Garage organization
You may be wondering how easy it was to stay organized with one huge open garage vs having drawers and compartments. A big drawer system, especially if it’s made of wood, adds weight to your build and is another component of the van that you have to worry about breaking if you like to drive off-road.
Having a big open space was great because we could store our gear in plastic bins and duffel bags. This gave us a lot of flexibility to swap out gear each season.
There was L-track along the floors and side walls that we used to quickly strap bins down.
I opted to keep my garage area simple and easy to access
Power System
Running low on power can be stressful—not to mention harmful to your batteries if they drop too low—so I wanted a setup that would keep everything running smoothly. We lived in this Sprinter van for 8 months a year, so I needed a system that could handle electric bikes, my computer, camera, induction stove, heater, and other electronics without any worries, especially in winter.
Batteries
This van was built before lithium batteries became the industry standard. Instead it had a 660 amp/hour AGM battery bank, which at the time was considered to be VERY powerful.
Note: Since then, AGM batteries have mostly been phased out of new van conversions for lithium, and in general people have really beefed up their batteries banks. For example, in my current rig, we have 1000 amp hours of lithium batteries.
In the 4 years that I lived mostly full-time in this van, we never had to plug in out of necessity, and the system was powerful enough for our needs. The only time we found ourselves conserving was in the winter when we were cooking on the induction stove a lot and the solar panels weren’t as effective.
The batteries got charged in 2 ways. First we had a hearty panel system on the roof.
The batteries were also hooked up to the van’s alternator which I highly recommend. It’s helpful to be able to charge the batteries while you’re driving especially when your batteries are low and the sun isn’t out.
Solar panels
There were 445 watts of Zamp Solar panels on the roof. Zamp (now owned by Dometic) makes all of their panels right here in the US.
Almost the entire roof was covered except a small walkway in the center of the roof rack. There were four 80-watt panels and one 125 watt panel.
To give you a rough idea of how much power solar can produce – on a fully sunny day, one of my single 80-watt solar panels could create enough power to run the fridge.
Inverter
The final piece of any van’s electrical system is an inveter, which converts battery power into usable AC power for my appliances and outlets. Inverters are rated by wattage, and the larger the wattage, the more applicances they can handle at once. I had a 2000-watt pure-sine inverter which is pretty standard and can handle an induction stove or a blender and charging small devices at the same time.
Temperature Control
Battery banks at the time weren’t powerful enough to reliably run an air conditioning without having to be plugged in. Good news…that’s changed so if you want an AC (my new rig has one), it is possible. If you don’t have or want AC, here are some tips for staying cool in your van in the summer.
Ceiling fans
I had two Maxx Air Fans. One above the galley and one above the bed. They each have a rain sensor and create really nice airflow in the van. Compared to my Fantastic Fan in my first Sprinter Van, I prefer the Maxx Fans.
Windows
We had windows running the length of the van. The front and rear ones had vents that you could open. With the fans running, we could get pretty good airflow in the van, especially at night.
Insulating window shades
All of the window coverings were insulated. This helped keep things cooler in the summer and prevented warm air from escaping through the windows in the winter.
Privacy & insulation curtain
The curtain that led to the front of the van was also insulated with zippered walkway in the middle. This was one of my favorite things in the van because it was incredibly easy to zip closed when we wanted privacy or to insulate the living area from the cab.
Heating for winter adventures
For heat in the winter, we had a Webasto Dual Top Diesel Heater. The Webasto produces hot air and hot water and runs off the diesel in your existing diesel tank.
We had our van down to single digits at night many times on ski trips, and the van always felt toasty warm inside.
The biggest issue with Webasto is that it’s really hard to find places to service them if something goes wrong. While the Webasto functioned well, I would recommend looking at a different diesel heater brand.
Water Systems
I wanted my entire plumbing system contained inside the van, so I didn’t have to worry about anything freezing in the winter. It was a simple streamlined setup and very easy to fill up our water.
Water tanks
I had a 25-gallon water tank inside a cabinet in the garage, alongside the Webasto Dual Top heater which stores an additional 3 gallons of hot water in the boiler. The BPA-free water tank was permanent, but it could easily be filled using a hose or 5-gallon jugs if I couldn’t find a spigot with potable water.
Water that runs through lines to the sink goes through a three-stage charcoal water filter that ensures the water we were drinking was clean.
Shower
I skipped the indoor shower in this van. With 25 gallons of water, you can’t really do much showering or you’d be filling up your tanks constantly. Instead, we had an outdoor shower where we could quickly hook up a shower hose to the back of the water tank. To be honest, we never really used the outdoor shower except for a hand full of times. Showering outside can only be done a few months a year or its too cold, and you also have to be somewhere private enough to use it. There is also the issue of the greywater runoff which means you can’t use it in a paid campground.
Since there was no dedicated bathroom in this van, I wanted the smallest, easiest toilet to deal with. For pee, we peed in pee jars and for poop, we used this foldable Go Anywhere toilet that utilizes wag bags. Once you’re done going, the bag just goes in the trash can. The bags do get pricey, so if there was a clean public toilet available, we would go in that instead.
I had two different types of flooring in this van. A vinyl weave in the font and a durable diamond plate vinyl in the gear garage.
The vinyl weave in the front looked nice, but it was IMPOSSIBLE to clean. Every little piece of dirt and grime got stuck in the weave, and I ended up covering up a good chunk of the floor with a rug. This floor material was my least favorite part of the whole van.
In the garage, the diamond plate vinyl was scratch resistant, which was perfect for sliding around our bins and bikes. It was not the most elegant looking, but it was very functional for its purpose.
The walls in this van were made of a synthetic, non-toxic leather material called Sileather, which I absolutely loved. It was eco-friendly and waterproof so you could wipe it down with a wet cloth. It was also perfect for dog owners since dog hair and dust didn’t stick to it.
I would highly recommend Sileather if you are planning out a van build.
What questions do you have about this Sprinter van conversion? Leave a comment below and let me know!
Every November, the REI has a huge winter sale that I think is one of their best sales of the year. This year’s sale is taking place November 15-25, and it’s a great time to stock up on winter gear, holiday gifts, or outdoor products that you want for next summer.
In this post, I’ve scoured the REI website and handpicked the best REI Winter Sale deals with discounts up to 40% off. Everything I recommend here I’ve personally tried.
REI Co-op is my favorite outdoor gear retailer and a long-time supporter of my work here at Bearfoot Theory. Their 1-year return policy for Members is hands-down the best in the industry, and Members also get 10% back on their purchases every year.
1) 30% off All REI Clothing and Accessories
All REI Co-op Brand Clothing is 30% off. I’ve worn a lot of different REI apparel over the years, and here are a few of my favorite pieces that are worth checking out during the sale:
REI Sahara Shade Hoodies: This UPF 50+ hoody is one of my favorite sun shirts. The full-coverage hood protects my face and neck from the sun, and the fabric breathes really well.
REI Activator Pants: These are some of my favorite winter hiking pants. They are stretchy, repel moisture, and have a warm lining that keeps your legs insulated on snowy hikes. The come in men’s and women’s versions.
Wearing my REI Sahara Shade Hoody
2) 30% off All REI Camping and Hiking Gear
If you’re looking to get a new tent or other big ticket item, all REI Co-op Brand Hiking and Camping Gear is 30% off. Here is some of my favorite REI gear to check out:
REI Co-op Siesta Hooded 20 Double Sleeping Bag: If you want to snuggle up with your sweetie, this 2-person 20-degree sleeping bag is cozy with a full zip on both sides so you can moderate your temperature.
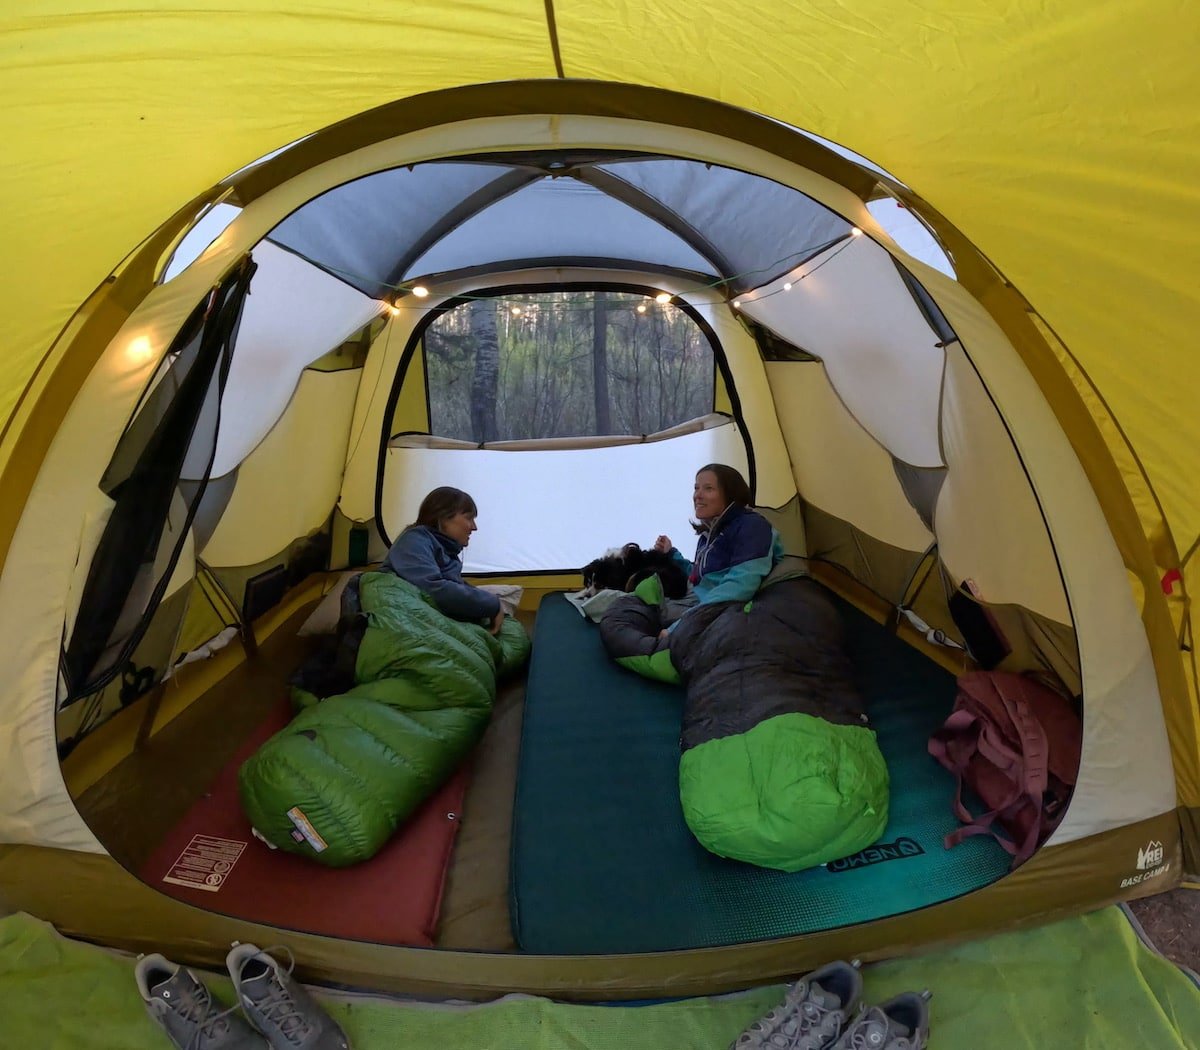
REI Base Camp 4 Tent: This is my go-to car camping tent. It’s spacious with a HUGE vestibule, tons of pockets, and plenty of windows for ventilation. I’ve used it in wind and rain, it is durable and great at keeping rain out. See my REI Base Camp 4 Review for more details.
REI Co-op Multilite Towels: These quick-drying towels are so versatile. I have at least 4 of them in my rig that I use for drying dishes, wiping down the dogs, showers, and more.
3. $100 Off Garmin inReach Mini 2
If you’ve been following me for a while, you’ve heard me talk about the Garmin Mini 2. I think it’s a MUST for anyone who likes to get out in the backcountry where there isn’t cell service. It can be used to send and receive texts or to call for help if you have an emergency. I’ve even used it to get roadside assistance when my Sprinter Van battery died outside of Sun Valley one winter.
4. 25% off all Oboz Footwear
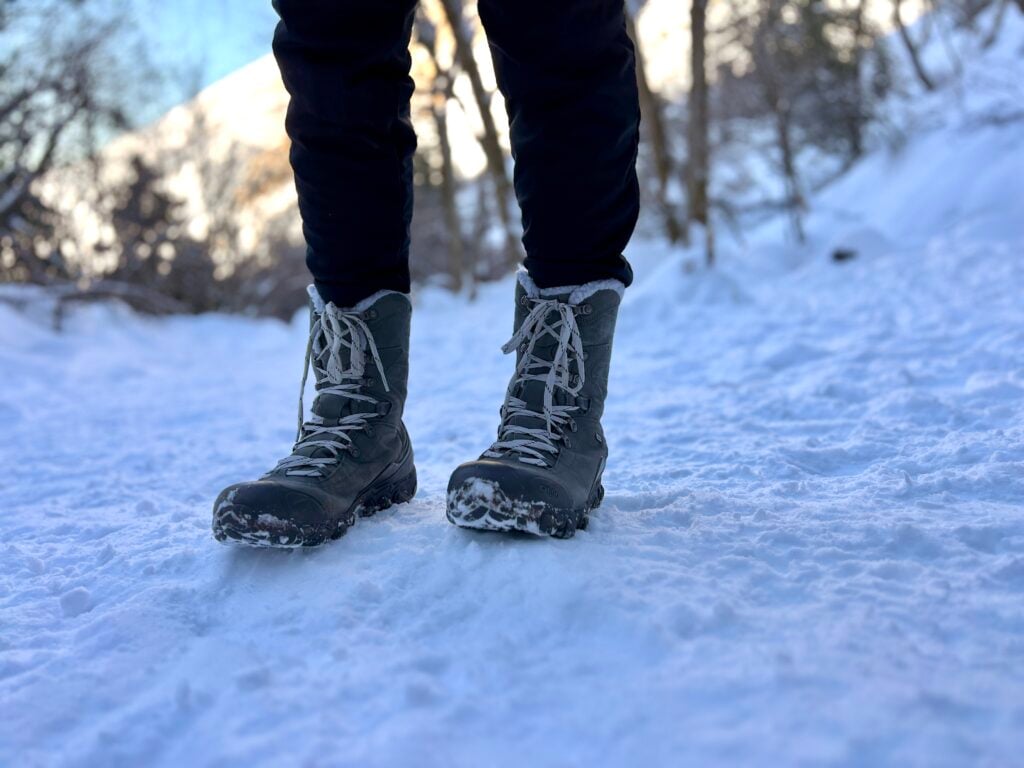
I’m a huge fan of Oboz Footwear, so I’m excited to see that every Oboz model is 25% off during the REI Winter Sale (both men’s and women’s). I’m especially fond of the Katabatic for fast and light summer hiking and the Insulated Bridger for winter. If you need help deciding which Oboz model is right for you, check out this post on the Oboz models I use most frequently.
Hiking in the Oboz Bridger Insulated winter boots
5. 25% off All Outdoor Research Outerwear
I have two Outdoor Research jackets that I’m especially fond of and all Outdoor Research outerwear is 25% off (with the exception of ski jackets) in the REI Winter Sale. Check out these two:
I’m a huge fan of Icebreaker. They make my all-time favorite merino wool base layers for winter hiking and skiing, and I also have a few their sweaters that are so soft and comfortable. However, Icebreaker clothing tends to be pricey, so I always jump at the chance to grab a new piece when they are on sale. During the REI Winter Sale, all Icebreaker clothing is 25% off. If you’re new to Icebreaker, I recommend starting with the Oasis 200 crew top (women’s)(men’s) and the Oasis 200 Thermal leggings (women’s)(men’s).
Here I’m wearing the Icebreaker Oasis 200 Baselayer, my go-to for snowy winter adventures
7) 25% off all Rumpl Blankets
Rumpl makes awesome camping blankets. I’ve been using the 2-person, original puffy as my comforter in my Sprinter Van for years. They are very durable (standing up to my 2 dogs), shake off easily, and can be thrown in the washing machine when they need a refresh. Rumpl blankets come in different sizes and prints, all of which are 25% off.
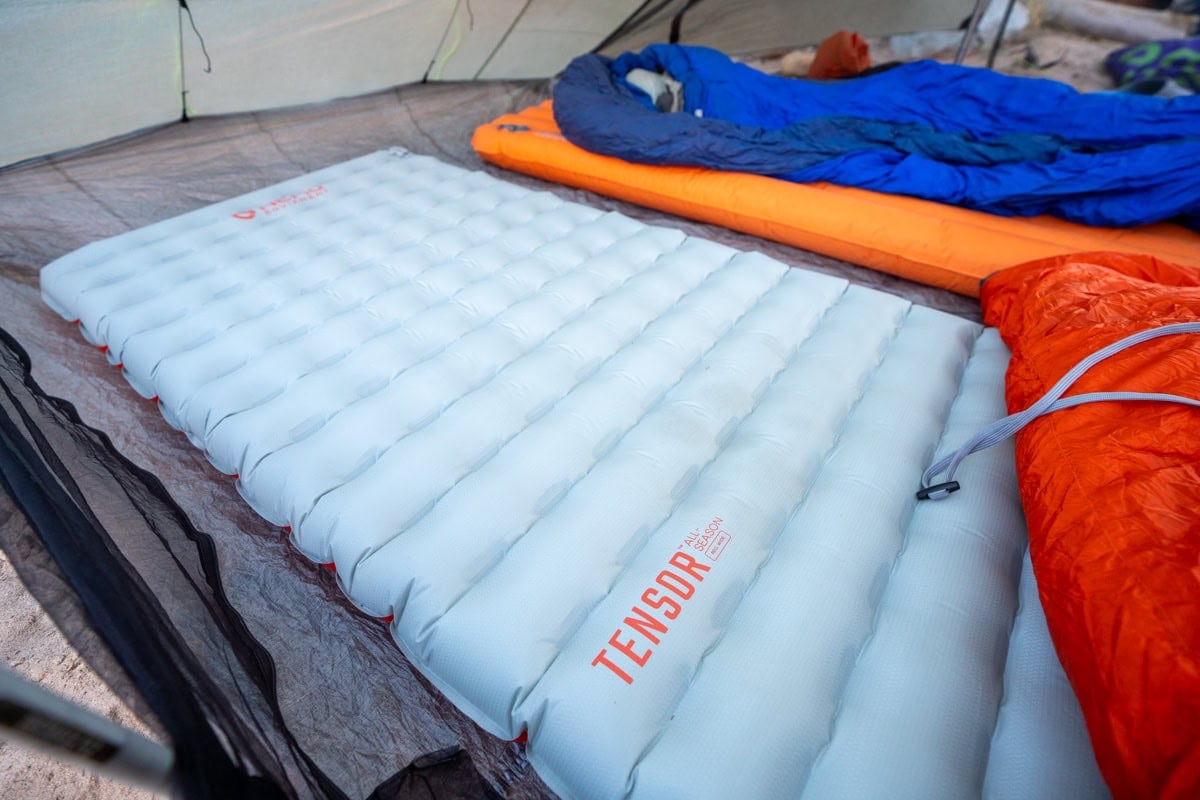
8) 25% off NEMO Tensor Ultralight Insulated Sleeping Pad
If you’ve struggled to find a comfortable sleeping pad for backpacking, I encourage you to try the NEMO Tensor Ultralight Insulated Sleeping Pad, which is currently 25% off. It’s 3.5 inches thick, and it has a valve that allows you to adjust the amount of air inside so you get just the right firmness. With an R-value of 5.4, you can rely on this even in the colder months. And to top it off, it’s incredibly easy to blow up thanks to the inflation sack that it comes with.
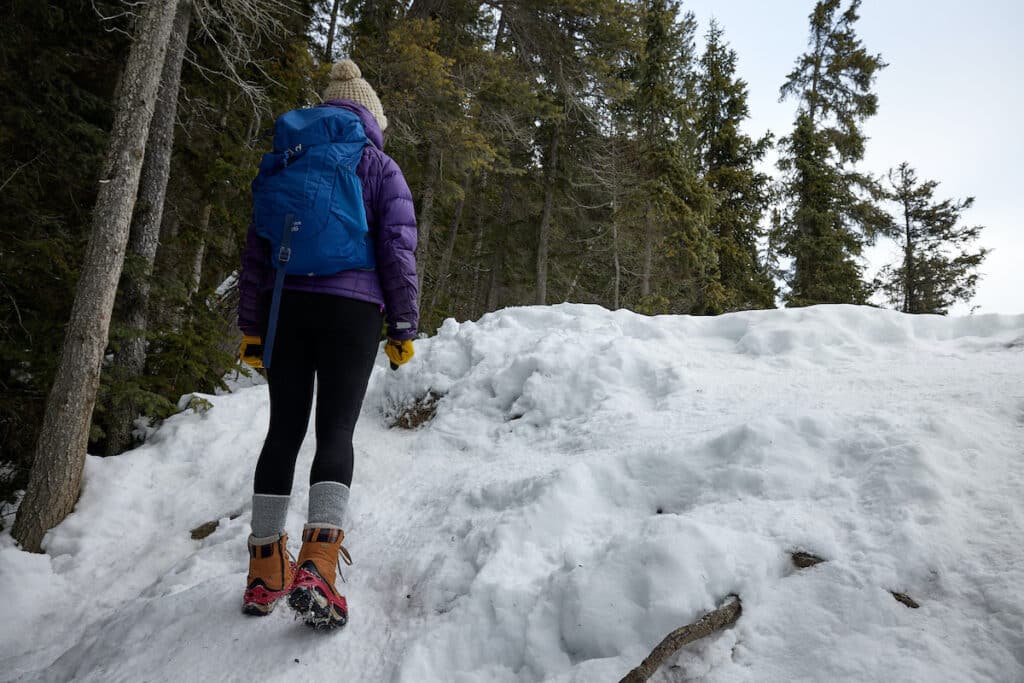
9) 20% off Kahtoola Traction Systems
If you get nervous walking on ice in the winter, you have to get a pair of Kahtoola Microspikes which are 20% off during the REI Winter Sale. When I feel ice on the trail, I just slip these on over my boots, and I instantly feel so much safer and more confident. When you’re buying them, double check the sizing since you’ll want to get a bigger size if you are using them over bulkier winter boots.
Using my Kahtoola microspikes to get better grip on an icy trail in Canada.
10) 25% off all Cotopaxi Clothing and Accessories
I’ve got a few Cotopaxi pieces that I really love, and all Cotopaxi apparel is 25% during the sale. I want to give a special shoutout to the Cotopaxi Tech 5-Panel Hat. I got this hat last summer, and it’s become a staple. It’s so light, I hardly notice I’m wearing it, and the brim doesn’t block my vision when I’m hiking. It’s also very breathable, even in the muggiest climates.
11) 25% off all Biolite Lighting
If you’re looking for a way to add some ambiance to your campsite, all Biolite lighting is 25% off. They make some compact, portable lanterns, and I really love the Biolite 325 Headlamp. I’m actually not sure why this headlamp doesn’t get better reviews, because I’ve been using it for years without any issues. I love how easy the strap is to adjust, it’s very light, and the charge easily lasts a 4-night backpacking trip as long as you aren’t using it on the highest setting.
Wearing the Biolite 325 Headlamp
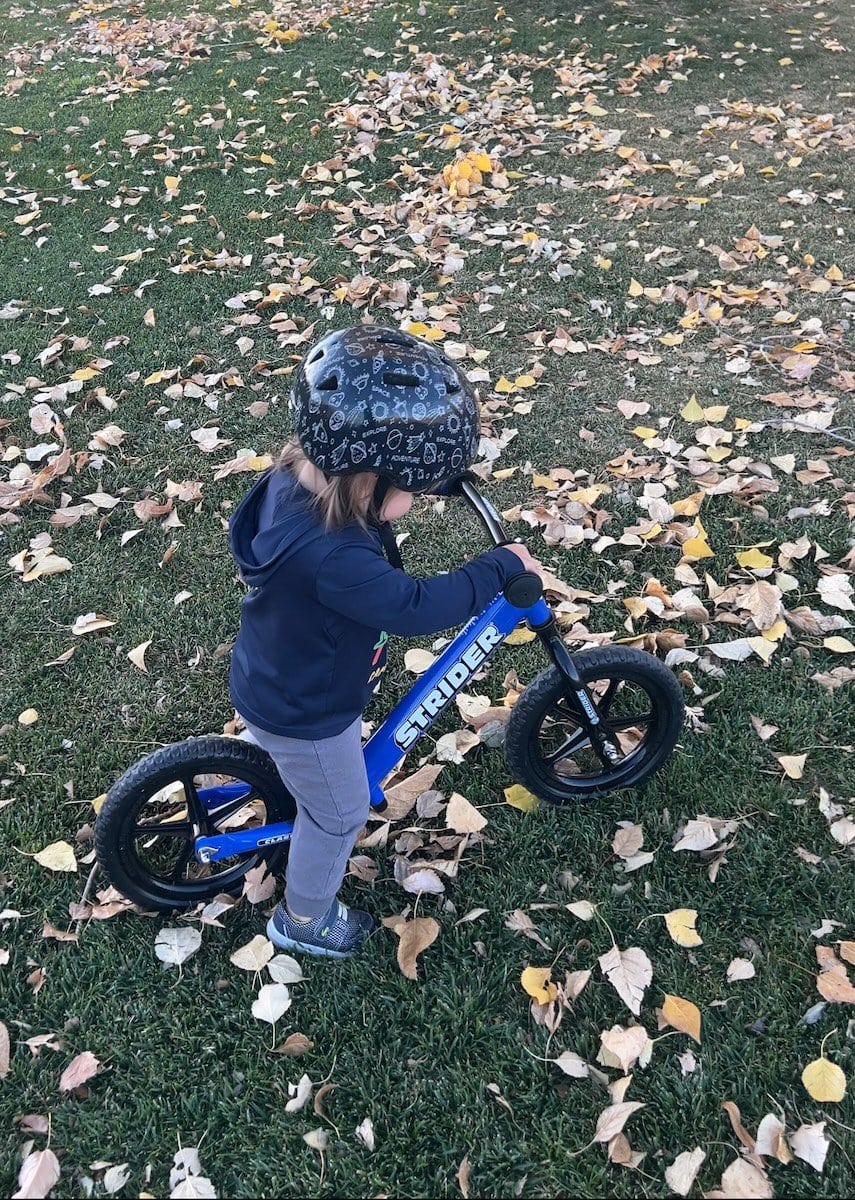
12) 20% off Strider Balance Bikes
If you’ve got a little tyke like me, my son Herbie who is almost 2, loves cruising around on his Strider Balance Bike, which is 20% off. Not only is it fun, but he’s learning how to balance, so when it’s time to graduate to a real bike, the transition will be much easier. The seat and handlebars are fully adjustable, so the bike can grow with your little one.
13) 25% off all Sea to Summit Cook Gear
Sea to Summit makes great collapsible cooking gear that can save space in your pack or camping bins. It’s all 25% right now too! I have some of their silicone collapsible pots that are great for backpacking, and I’ve been eyeing their dinnerware for my new truck camper.
All REI travel gear is 30% off. I have two pieces of REI luggage that I use on a majority of my trips. The first is the REI Co-op Big Haul 28L Duffel which is my choice for short weekend trips. I also use it daily in the winter to keep all of my ski accesories organized in my car.
I also have the REI Co-op Big Haul 30″ Wheeled Duffel which is one of the toughest roller bags I’ve owned. It’s got a rugged, water-resistant exterior and really durable wheels that can withstand bumpy roads and being dragged over curbs.
I got the REI Big Haul Duffel back in 2017, and I’m still using it today
Every November, the REI has a huge winter sale that I think is one of their best sales of the year. This year’s sale is taking place November 15-25, and it’s a great time to stock up on winter gear, holiday gifts, or outdoor products that you want for next summer.
In this post, I’ve scoured the REI website and handpicked the best REI Winter Sale deals with discounts up to 40% off. Everything I recommend here I’ve personally tried.
REI Co-op is my favorite outdoor gear retailer and a long-time supporter of my work here at Bearfoot Theory. Their 1-year return policy for Members is hands-down the best in the industry, and Members also get 10% back on their purchases every year.
1) 30% off All REI Clothing and Accessories
All REI Co-op Brand Clothing is 30% off. I’ve worn a lot of different REI apparel over the years, and here are a few of my favorite pieces that are worth checking out during the sale:
REI Sahara Shade Hoodies: This UPF 50+ hoody is one of my favorite sun shirts. The full-coverage hood protects my face and neck from the sun, and the fabric breathes really well.
REI Activator Pants: These are some of my favorite winter hiking pants. They are stretchy, repel moisture, and have a warm lining that keeps your legs insulated on snowy hikes. The come in men’s and women’s versions.
Wearing my REI Sahara Shade Hoody
2) 30% off All REI Camping and Hiking Gear
If you’re looking to get a new tent or other big ticket item, all REI Co-op Brand Hiking and Camping Gear is 30% off. Here is some of my favorite REI gear to check out:
REI Co-op Siesta Hooded 20 Double Sleeping Bag: If you want to snuggle up with your sweetie, this 2-person 20-degree sleeping bag is cozy with a full zip on both sides so you can moderate your temperature.
REI Base Camp 4 Tent: This is my go-to car camping tent. It’s spacious with a HUGE vestibule, tons of pockets, and plenty of windows for ventilation. I’ve used it in wind and rain, it is durable and great at keeping rain out. See my REI Base Camp 4 Review for more details.
REI Co-op Multilite Towels: These quick-drying towels are so versatile. I have at least 4 of them in my rig that I use for drying dishes, wiping down the dogs, showers, and more.
3. $100 Off Garmin inReach Mini 2
If you’ve been following me for a while, you’ve heard me talk about the Garmin Mini 2. I think it’s a MUST for anyone who likes to get out in the backcountry where there isn’t cell service. It can be used to send and receive texts or to call for help if you have an emergency. I’ve even used it to get roadside assistance when my Sprinter Van battery died outside of Sun Valley one winter.
4. 25% off all Oboz Footwear
I’m a huge fan of Oboz Footwear, so I’m excited to see that every Oboz model is 25% off during the REI Winter Sale (both men’s and women’s). I’m especially fond of the Katabatic for fast and light summer hiking and the Insulated Bridger for winter. If you need help deciding which Oboz model is right for you, check out this post on the Oboz models I use most frequently.
Hiking in the Oboz Bridger Insulated winter boots
5. 25% off All Outdoor Research Outerwear
I have two Outdoor Research jackets that I’m especially fond of and all Outdoor Research outerwear is 25% off (with the exception of ski jackets) in the REI Winter Sale. Check out these two:
I’m a huge fan of Icebreaker. They make my all-time favorite merino wool base layers for winter hiking and skiing, and I also have a few their sweaters that are so soft and comfortable. However, Icebreaker clothing tends to be pricey, so I always jump at the chance to grab a new piece when they are on sale. During the REI Winter Sale, all Icebreaker clothing is 25% off. If you’re new to Icebreaker, I recommend starting with the Oasis 200 crew top (women’s)(men’s) and the Oasis 200 Thermal leggings (women’s)(men’s).
Here I’m wearing the Icebreaker Oasis 200 Baselayer, my go-to for snowy winter adventures
7) 25% off all Rumpl Blankets
Rumpl makes awesome camping blankets. I’ve been using the 2-person, original puffy as my comforter in my Sprinter Van for years. They are very durable (standing up to my 2 dogs), shake off easily, and can be thrown in the washing machine when they need a refresh. Rumpl blankets come in different sizes and prints, all of which are 25% off.
8) 25% off NEMO Tensor Ultralight Insulated Sleeping Pad
If you’ve struggled to find a comfortable sleeping pad for backpacking, I encourage you to try the NEMO Tensor Ultralight Insulated Sleeping Pad, which is currently 25% off. It’s 3.5 inches thick, and it has a valve that allows you to adjust the amount of air inside so you get just the right firmness. With an R-value of 5.4, you can rely on this even in the colder months. And to top it off, it’s incredibly easy to blow up thanks to the inflation sack that it comes with.
9) 20% off Kahtoola Traction Systems
If you get nervous walking on ice in the winter, you have to get a pair of Kahtoola Microspikes which are 20% off during the REI Winter Sale. When I feel ice on the trail, I just slip these on over my boots, and I instantly feel so much safer and more confident. When you’re buying them, double check the sizing since you’ll want to get a bigger size if you are using them over bulkier winter boots.
Using my Kahtoola microspikes to get better grip on an icy trail in Canada.
10) 25% off all Cotopaxi Clothing and Accessories
I’ve got a few Cotopaxi pieces that I really love, and all Cotopaxi apparel is 25% during the sale. I want to give a special shoutout to the Cotopaxi Tech 5-Panel Hat. I got this hat last summer, and it’s become a staple. It’s so light, I hardly notice I’m wearing it, and the brim doesn’t block my vision when I’m hiking. It’s also very breathable, even in the muggiest climates.
11) 25% off all Biolite Lighting
If you’re looking for a way to add some ambiance to your campsite, all Biolite lighting is 25% off. They make some compact, portable lanterns, and I really love the Biolite 325 Headlamp. I’m actually not sure why this headlamp doesn’t get better reviews, because I’ve been using it for years without any issues. I love how easy the strap is to adjust, it’s very light, and the charge easily lasts a 4-night backpacking trip as long as you aren’t using it on the highest setting.
Wearing the Biolite 325 Headlamp
12) 20% off Strider Balance Bikes
If you’ve got a little tyke like me, my son Herbie who is almost 2, loves cruising around on his Strider Balance Bike, which is 20% off. Not only is it fun, but he’s learning how to balance, so when it’s time to graduate to a real bike, the transition will be much easier. The seat and handlebars are fully adjustable, so the bike can grow with your little one.
13) 25% off all Sea to Summit Cook Gear
Sea to Summit makes great collapsible cooking gear that can save space in your pack or camping bins. It’s all 25% right now too! I have some of their silicone collapsible pots that are great for backpacking, and I’ve been eyeing their dinnerware for my new truck camper.
All REI travel gear is 30% off. I have two pieces of REI luggage that I use on a majority of my trips. The first is the REI Co-op Big Haul 28L Duffel which is my choice for short weekend trips. I also use it daily in the winter to keep all of my ski accesories organized in my car.
I also have the REI Co-op Big Haul 30″ Wheeled Duffel which is one of the toughest roller bags I’ve owned. It’s got a rugged, water-resistant exterior and really durable wheels that can withstand bumpy roads and being dragged over curbs.
I got the REI Big Haul Duffel back in 2017, and I’m still using it today
When my partner Ryan and I first moved into a van together, we quickly learned that living in a tiny space together — just the two of us and our stuff (plus a dog)— brought new challenges to our relationship. Privacy became a rare luxury, and at times the van, though cozy, felt very cramped.
Navigating van life with a significant other is both beautiful and challenging. There are amazing moments—like watching sunsets from bed and laughing over quirky van life mishaps—but it also takes effort. Setting boundaries, communicating well, and finding ways to balance time together and apart are essential. Over time, Ryand I found a rhythm that works, and it’s brought us closer in ways I hadn’t expected.
In this post, I’ll share what I’ve learned about keeping your relationship strong when you are a couple living in a van.
1. Be Willing to Compromise
Being willing to compromise is the #1 most important thing you need to do to make van life work as a couple. In a tiny space, you quickly realize that you can’t have everything your way—not if you want peace and harmony. Ryan and I have had to learn when to push for what’s important and when to let the little things go.
For example, some days I’m set on hitting a hiking trail, while Ryan has his sights on a mountain bike ride. Instead of clashing, we find ways to make it work. Sometimes we split up for the morning and then meet back at the van for lunch, or we take turns picking our activities.
Every choice in van life becomes a shared decision, from daily plans to where we’ll park for the night. Sometimes I get my way, and other times Ryan gets his. Compromise keeps the peace and means that we both get we want – just not always at the same time.
2. Respect your partner’s priorities
Respecting each other’s priorities is essential. If you don’t, you surely won’t last long as a couple in a van.
In our case, I have to make time to work and run my business. I also like to carve out a few quiet moments for meditation, and I absolutely cannot sleep if the van isn’t perfectly flat. For Ryan, coffee is a non-negotiable; he doesn’t like driving anywhere until he’s had his morning brew. Balancing these needs takes a little planning and a mutual respect.
We’ve learned to accommodate each other’s priorities by building them into our days. If we’re moving early, we make sure we have enough time for Ryan to get his coffee, and I’ll find a quiet moment to meditate before we hit the road. When it’s time to park, we both keep an eye out for level ground so I can sleep comfortably. Then when I need to work, Ryan takes the dogs out so I can focus.
Respecting these little but important things for each other not only keeps our routine smooth but shows that we’re both invested in making van life enjoyable for each other. These small gestures of respect go a long way toward keeping us both happy and balanced on the road.
3. Communicate Clearly & Effectively
This probably sounds obvious, but communication has been the cornerstone of making our van life relationship work. It’s not like a house where when you have a fight, you can escape to another room. So in order to maintain a happy home on wheels, it’s important to be able to put out fires before they get too big.
The reality is that things can get tense—especially when you’re tired, hungry, or just can’t find a good spot to park for the night. We’ve had our share of snippy exchanges, but learning to communicate openly and calmly has made all the difference.
We are far from perfect, but over the years, we’ve learned what each other’s triggers are, and we try to take a breather if things start to get heated. Sometimes it’s better to just let things go, especially if what you are arguing about isn’t all that important.
4. Take Time for Yourself
Living on the road doesn’t leave a lot of room for alone time, but it’s crucial. Spending so much time together really can be wonderful, but without moments to recharge on your own, it’s possible to feel a bit claustrophobic or like you are losing yourself.
Alone time helps us maintain our individuality. We are different people and have our own interests that need to be tended to. It doesn’t have to be much — a quick solo walk or a half-hour outside with a book or a podcast is enough. These small breaks give me space to clear my mind and allow us to fully appreciate each other’s company for the other 23.5 hours a day that we are together.
5. Split the chores
One thing we quickly learned was how important it is to share the workload. Van life involves a surprising amount of chores and upkeep, from cleaning and cooking to organizing and fixing things on the fly. Ryan loves organizing our van’s garage, while I usually handle things like making the bed and tidying up the front. Ryan also takes charge of dinner, and I usually clean up afterward (unless I’m busy working on my blog).
By dividing tasks, we avoid the constant back-and-forth of “who’s turn is it?” and we both get to focus on the parts we enjoy most. Having a clear division of labor has made life on the road a lot smoother.
6. Stay Connected with the Outside World
While it’s great to share the journey closely with your significant other, having a social life on the road brings fresh energy to your relationship. We love visiting friends and family whenever possible, attending festivals and events, and camping with other van lifers. These connections help us avoid isolation and prevent us from relying solely on each other for social interaction.
7. Have Fun!
Ultimately, we got into van life because we wanted to share incredible experiences together, and it’s important not to lose sight of that. Even when we’re spending every day side-by-side, we try to make time for the things that bring us both joy. For us, that might be watching the sunset from a cozy spot or planning our next big hike.
Van life isn’t conventional, and it’s definitely not for everyone. But if you can find ways to respect each other’s needs and communicate effectively, van life as a couple will likely be one of your greatest adventures together.
What is the best thing about living van life with your significant other? What is the most challenging thing? Share your questions, tips, and experiences down in the comments.